သမိုင္​း

Theme images by Storman. Powered by Blogger.

Text Widget

Sports

Gadgets

Blog Archive

Travel

Definition List

Saturday, July 21, 2012

Zawgyi Font on Android

  1. Download Type Fresh and AndExplorer App from Android Market
  2. Type Fresh >> Download Here 
  3. AndExplorer >> Download Here
  4. Copy your your font file (e.g. Zawgyi.ttf) to your SDCard
  5. Click on DroidSansFallback.ttf and choose your font file (Zawgyi.ttf) from your SDCard to swap the font
  6. Click Android menu button, Choose Apply Fonts, restart your Android device

Sunday, July 15, 2012

How to install Zawgyi on JailBroken iPod/iPhones

This guide only applies to Jailbroken iPod Touch & iPhones.
အခုေရးမယ့္ Guide က Jailbroken လုပ္ထားတဲ့ iPod Touch နဲ႔ iPhones ေတြေပၚမွာ Zawgyi Font ကုိ install လုပ္တဲ့ နည္းျဖစ္ပါတယ္။ Zawgyi font နဲ႔ ေရးထားတဲ့ webpages ေတြကုိ ဖတ္လုိ႔ရေအာင္ပါ။ အခု guide က Windows ေပၚမွာ လုပ္နည္းကုိပဲ ေရးသြားပါမယ္။ iPod/iPhone ကေတာ့ ဘယ္ generation မဆို JB ျဖစ္ရင္ လုပ္လုိ႔ရပါတယ္။
Font ကုိ install လုပ္ဖို႔ iPod ေပၚမွာ OpenSSH တင္ထားဖို႔ လိုပါမယ္။ OpenSSH ကုိ Cydia ကေန install လုပ္လိုက္ပါ။ ျပီးရင္ Windows အတြက္ WinSCP ကုိ ဒီကေန download လုပ္ျပီး Install လိုက္ပါ။ iPod ရဲ့ FontCache file ကို edit လုပ္ဖို႔ pledit.exe ကုိလဲ ဒီကေန download လုပ္ထားပါ။ တင္မယ့္ Zawgyi font file ကုိလဲ အဆင္သင့္ လုပ္ထားပါ။ တစ္ခု သတိထားရမွာက font extension က .ttf လုိမ်ိဳး အကုန္လံုး အေသးနဲ႔ ျဖစ္ရပါမယ္။ .TTF ျဖစ္ေနရင္ rename လုပ္ထားလိုက္ပါ။
Step by step ကုိ Screen shot ရိုက္ျပီး ျပခ်င္ေပမယ့္ ကၽြန္ေတာ့္ iPod ကို မေန႔ကပဲ Original Firmware ျပန္တင္ထားလို႔ SSH နဲ႔ ၀င္လို႔မရေတာ့ပါဘူး။
WinSCP ကုိ သံုးျပီး iPod ထဲကုိ ၀င္ဖုိ႔ Wireless Connection တစ္ခုရွိဖို႔ လိုပါမယ္။ Access Point (or) Ad-Hoc နဲ႔ Connection တစ္ခု လုပ္လိုက္ပါ။ iPod ရဲ့ IP ကုိလဲ မွတ္ထားပါ။
WinSCP ကုိ run လိုက္ပါ။ Hostname: ဆိုတဲ့ ေနရာမွာ iPod ရဲ့ IP address ကုိ ထည့္ရပါမယ္။ Port က ေတာ့ 22 ပါပဲ။ Username ေနရာမွာ “root” နဲ႔ password က “alpine” လို႔ ထည့္ေပးလိုက္ပါ။ (quotes ” ” ေတြ မပါပဲထည့္ရမွာပါ) ျပီးရင္ Login ကုိ ႏွိပ္ေပးလိုက္ပါ။
Login successful ျဖစ္သြားရင္ WinSCP ထဲက ညာဖက္မွာ iPod ရဲ့ System file ေတြကုိ ေတြ႕ရမွာပါ။ ဘယ္ဖက္က PC ထဲက ဖိုင္ေတြ ျဖစ္ပါတယ္။ အဲဒီ ညာဖက္က file directory ေတြအေပၚနားမွာ Directory ေျပာင္းတဲ့ Dropdown button ေလးတစ္ခု ရွိပါတယ္။ သူ႔ကုိ ႏွိပ္ျပီး “\” ကုိ ေရြးေပးလိုက္ပါ။ ဒါဆိုရင္ iPod ရဲ့ root ထဲကုိ ေရာက္သြားပါျပီ။
Capture
System ဆိုတဲ့ folder ကုိ လိုက္ရွာျပီး /system/library/fonts/cache အထိ ၀င္လုိက္ပါ။ ျပီးရင္ Zawgyi.ttf ကုိ အဲဒီထဲကုိ ကူးထည့္လိုက္ပါ။
/fonts ကုိ ျပန္၀င္လိုက္ျပီး CGFontCache.plist ဆုိတဲ့ ဖိုင္ကုိ စက္ထဲကုိ ကူးထည့္လိုက္ပါ။ အဲဒီ ဖုိင္ကုိ edit မလုပ္ခင္မွာ backup အရင္ လုပ္ထားလိုက္ပါ။
pledit.exe နဲ႔ CGFontCache.plist ကုိ ဖြင့္လိုက္ပါ။ ကၽြန္ေတာ္တို႔ Zawgyi အတြက္ entry ၂ ခု လုပ္ေပးဖို႔ လိုပါမယ္။ Zawgyi ဆုိေတာ့ Z နဲ႔စလို႔ List ရဲ့ ေအာက္ဆံုးက Z ေနရာမွာ ထည့္ရမွာပါ။ (နမူနာ CGFOntCache.plist ကုိ download လုပ္ဖုိ႔ ထည့္ေပးထားပါတယ္။) ေအာက္မွ ျပထားတဲ့ code ကုိ ရွာလိုက္ပါ။
<key>Zapfino</key>
<string>/System/Library/Fonts/Cache/Zapfino.ttf</string>
ျပီးရင္ သူ႔ရဲ့ေအာက္မွာ ကပ္ျပီး အဲဒီ ပံုစံအတုိင္းပဲ အေပၚက Key ကြင္းထဲမွာ Zawgyi-One လို႔ ထည့္ျပီး ေအာက္က String ေနရာမွာက Zawgyi ရဲ့ path ကုိ ထည့္ေပးလိုက္ပါ။ ဒါဆုိရင္ ဒီလို ျဖစ္သြားပါျပီ။
<key>Zapfino</key>
<string>/System/Library/Fonts/Cache/Zapfino.ttf</string>
<key>Zawgyi-One</key>
<string>/System/Library/Fonts/Cache/Zawgyi-One.ttf</string>
Capture2
ေနာက္ တစ္ဆင့္ကုိ ဆက္သြားပါမယ္။ အေပၚက အတိုင္းလိုပါပဲ CGFontCache ရဲ့ ေအာက္ဆံုးမွာ entry တစ္ခု ထည့္ေပးရပါမယ္။ ေအာက္မွာျပထားသလို ရွာျပီး ျဖည့္လိုက္ပါ။
<key>Zapfino</key>
<dict>
<key>Plain</key>
<string>Zapfino</string>
</dict>
<key>Zawgyi-One</key>
<dict>
<key>Plain</key>
<string>Zawgyi-One</string>
</dict>
တစ္ခု သတိထားရမွာက အခု code ရဲ့ ေအာက္ဆံုးက </dict> အျပီးမွာ ေနာက္ထပ္ </dict> ၂ ခု နဲ႔ </plist> ဆိုတာ တစ္ခု ရွိေသးတာပါ။
Capture3
Edit ျပီးသြားရင္ေတာ့ ျပင္ထားတဲ့ အခု CGFontCache ကုိ iPod ထဲက CGFontCache နဲ႔ replace လုပ္ျပီး iPod ကုိ reboot ခ်လုိက္ရင္ ေဇာ္ဂ်ီကုိ install လုပ္တာ ျပီးပါျပီ။ တျခား ျမန္မာ ေဖာင့္ေတြကုိလဲ ဒီနည္းနဲ႔ စမ္းျပီး Install လုပ္ၾကည့္လို႔ရပါတယ္။ တစ္ခုခု မွားသြားလို႔ရွိခဲ့ရင္လဲ backup လုပ္ထားတဲ့ CGFontCache ကုိ ျပန္ထည့္လိုက္ရံုပါပဲ။

Saturday, July 14, 2012

Web Development Websites

Zolai in kong tei kik hi in A Source pen The Voice Journal, Vol 8, No 30, July 16-22, 2012 pan kong lak kik hi.

Kawlgam zong Internet genloh Computer na ngawn a tun sawt hetlo hi in, kum kum 10 valdiak hi pan dinghi. Tua hi mah taleh Online zat dan te nasia mahmah ta a, Facebook chatting, Gtalk kikhem na cih te hi nawnlo in theih leh siamna teh ki hawm khawm diam2 in gam leh lei zunna in nei tek ta hi. Tu a hih manin Kawllai tawh Web Developing sinna te en suk ni.

Ayarmyay pen Kawlgam mi sungah Web Development a lunglut te ading a a thak leh akisam asak diak uh Gtn: Background laihdan, CSS tawh link bawl dan, cih te banah Ebooks zong ong koiuh sak lai uh hi.

A dang khat pen Web Guardians hi a, tua sung ah pen Web Development tawh kisai vive om a, Gtna: Javascript, Html, CSS, Php cihte tampi tak om hi. Gendan ding zong thei khang in hawh in na sim le ucin tel thei nu teh.

Software tawh kisai:
Software tawh kisai in a thak leh a lui update, a thupi mahmah, koite tam ki download pen cih oman, Freeware, Shareware, Editor's Selection leh Latest Download te a Category khen sa in om hi. Na hawh sin ve.
SnapFiles

Friday, July 6, 2012

တကမၻာလုံးက ဖုန္းအခ်င္းခ်င္း ပုိက္ဆံမကုန္ဘဲ Phone ေခၚၾကမယ္. (FREE)


 ကၽြန္ေတာ္တုိ႔အေနနဲ႔
ဖုန္းေတြ အသီးသီး ရွိၾကတယ္ဗ်ာ. ဖုန္းေခၚဆုိခေတြ အရမ္းမ်ားတယ္။ အဲ့ေတာ့
ပုိက္ဆံမကုန္ေအာင္ ဖုန္းေျပာတာတုိ႔၊ ျမန္မာလုိ chat တာတုိ႔၊ message
ပုိ႔တာတုိ႔ မလုပ္ခ်င္ဘူးလား။ အင္တာနက္ခက တစ္မိနစ္မွ 2 က်ပ္လား 20 လား
ေပးရတာပါ။ တန္ပါတယ္။ အဲ့လုိေခၚခ်င္ရင္ေတာ့  ေအာက္က အခ်က္ေတြနဲ႔
ျပည့္စုံဖုိ႔ေတာ့ လုိအပ္ပါတယ္။ အခု ကၽြန္ေတာ္ ကြန္ပ်ဴတာကေန ဟန္းဖုန္းကုိ
ဖရီးေခၚဆုိႏုိင္ေအာင္ ႀကိဳးစားၾကည့္ေနပါတယ္။ ဖုန္းနံပါတ္ကေတာ့
လုပ္ယူလုိ႔ရပါတယ္။ ဒါေပမယ့္ ခက္တာက android phone(အတု-အစစ္ကဲ့သုိ႔)
တစ္လုံးကုိ ကြန္ပ်ဴတာေပၚကေန စမ္းသုံးၿပီး ဖုန္းေခၚဖုိ႔အတြက္ ဖုန္းနံပါတ္နဲ႔
activate လုပ္ဖုိ႔က ရၿပီ။ အဲ့ထဲကုိ install လုပ္ဖုိ႔အဆင့္တစ္ဆင့္
လုိေနေသးလုိ႔ လုံး၀ ထည့္လုိ႔မရဘူးျဖစ္ေနတယ္။ ကဲဒါကထားပါ ကၽြန္ေတာ့္ဖက္က
အခက္အခဲေပါ့.


  •  မိမိဖုန္းဟာ iphone (or) android
    (or) Black berry (or) window phone အဲ့အမ်ိဳးအစား ၄ မ်ိဳးထဲက
    တစ္ခုခုျဖစ္ရပါမယ္။ (အခုအထိေတာ့ ဒီ ၄ မ်ိဳးပဲ ရွိပါေသးတယ္။ ေနာက္ထပ္ၿပီး
    update လုပ္ေနပါတယ္။)
  •  မိမိဖုန္းမွာ viber ဆုိတဲ့ free
    ေခၚဆုိႏုိင္တဲ့ software Download လုပ္ဖုိ႔နဲ႔ install လုပ္ဖုိ႔ internet
    လုိအပ္ပါလိမ့္မယ္။ Download လုပ္ဖုိ႔ခဲယဥ္းေနရင္လည္း ကၽြန္ေတာ္
    တင္ေပးလုိက္ပါ့မယ္။ မပူပါနဲ႔ memory card ထဲကုိသာ အဲ့ viber software
    ထည့္ၿပီး install လုပ္သြားလုိက္ပါ။ ကၽြန္ေတာ့္မွာ samsung Android
    အမ်ိဳးအစား ရွိလုိ႔ ကၽြန္ေတာ့္ဖုန္းကုိ ဥပမာထားၿပီးေတာ့ ေရးသားလုိက္ပါ့မယ္။
  • မိမိကုိယ္တုိင္ ဖုန္းမွာ အင္တာနက္ရွိလုိ႔ပဲ
    ျဖစ္ျဖစ္၊ wifi ရေနလုိ႔ပဲျဖစ္ျဖစ္ေပါ့၊ အဲ့ဒါမ်ိဳးဆုိခဲ့ရင္
    ပုိအဆင္ေျပတာေပါ့။ ႏုိင္ငံျခားက သူငယ္ခ်င္းဆီကုိ ဖုန္းေခၚခ်င္ရင္ အင္တာနက္
    ကေဖးဆုိင္ကုိ သြားထုိင္ၿပီး တစ္နာရီေလာက္ ဖုန္းေျပာလုိက္ေပါ့။ အဲ့ကေပးတဲ့
    wifi နဲ႔ ဖုန္းနဲ႔ခ်ိတ္ၿပီးေတာ့။ ေအာ္ဒါနဲ႔ေျပာဖုိ႔က်န္သြားပါတယ္။
    အဲ့လုိေခၚဆုိဖုိ႔အတြက္ တစ္ဖက္ဖုန္းမွာလည္းပဲ viber software ရွိရပါမယ္။
    အဲ့ဒါဆုိရင္ သူ႔ဖုန္းကုိ ကုိကေခၚမယ္ဆုိတာနဲ႔ သူကေမးပါလိမ့္မယ္. viber
    နဲ႔လား Dialer န႔ဲလားေပါ့၊ Dialer ကုိေရြးမိရင္ေတာ့ ငါးပါးေမွာက္ပါမယ္။
    oversea call နဲ႔ေပးရပါလိမ့္မယ္။ အဲ့ေတာ့ viber ကုိေရြးၿပီး
    ကုိေခၚခ်င္တဲ့သူရဲ႕ ဖုန္းနံပါတ္ကုိ ေခၚလုိက္ပါ။ ဟုိဖက္က ဟန္းဖုန္းမွာ viber
    နဲ႔သြားမည္ပါလိမ့္မယ္. သူကလည္း ကုိေခၚတယ္ဆုိတာ တန္းသိပါတယ္။ ဟုိဖက္က
    အုိေကႏွိပ္တာနဲ႔ ေျပာေပေတာ့ေပါ့။
  • အဲ့ေတာ့
    ခုနက ေျပာတဲ့ iphone (or) android (or) Black berry (or) window phone
    အဲ့အမ်ိဳးအစား ၄ မ်ိဳးမွာ အင္တာနက္ရွိေနခဲ့ရင္ http://www.viber.com
    ကုိသြားၿပီး ကုိ႔ဖုန္းအမ်ိဳးအစားကုိ ေရြးၿပီး Download လုပ္လုိ႔ရသလုိ၊
    Android ဖုန္းဆုိရင္ေတာ့ Play store ကေန အရင္ႏွိပ္ၿပီး search box ထဲမွာ
    viber လို႔ရုိက္ထည့္လုိက္တာနဲ႔ တန္းေပၚလာပါလိမ့္မယ္။ ေရြးၿပီးေတာ့သာ
    download လုပ္လုိက္ပါ။ download လုပ္ၿပီးတာနဲ႔ install ကုိ သူ႔ဟာသူ
    လုပ္သြားပါလိမ့္မယ္။ activate ျဖစ္ဖုိ႔အတြက္ မိမိရဲ႕ ႏုိင္ငံနဲ႔
    ဖုန္းနံပါတ္ကုိ ေရြးေပးရပါမယ္။ ေရြးၿပီး OK ႏွိပ္တာနဲ႔ ဖုန္းထဲကုိ message
    ေရာက္လာပါမယ္။ အဲ့ message ထဲက code ကုိ viber phone activate
    ျဖစ္ဖုိ႔အတြက္ ေတာင္းတဲ့အကြက္ထဲမွာ ရုိက္ထည့္ေပးလုိက္ပါ။ ဒါဆုိရင္ viber
    ရွိေသာ မည္သည့္ ဖုန္းကုိမဆုိ ခုေခၚ ခုေျပာလုိ႔ရသလုိ၊ message ပုိ႔ရင္လည္း
    ခုပုိ႔ ခုေရာက္ပါတယ္။ ကဲေျပာမယ့္သူခ်ည္းပဲလုိ႔ ထင္ပါတယ္။
    အဲေျပာဖုိ႔တစ္ခုက်န္သြားပါတယ္။ play store (or) www.play.google.com ကုိ
    ၀င္ဖုိ႔အတြက္ google account လုိအပ္ပါတယ္။ မိမိသုံးေနတဲ့ google account
    နဲ႔ ၀င္လည္း ရပါတယ္။ ၀င္လုိ႔ရမွသာ application ေတြကုိ ဖရီး Download
    လုပ္ခြင့္ရၾကမွာပါ။ apple က ထုတ္တဲ့ iphone နဲ႔ ipad ကုိေတာ့ google ကေန
    မထင္မွတ္ဘဲနဲ႔ ခဏတာအတြင္း အသုံးျပဳသူအေရအတြက္နဲ႔ service ေကာင္းေကာင္းနဲ႔
    လုပ္ျပလုိက္ၿပီဆုိေတာ့ apple အေနနဲ႔ေတာ့ နည္းနည္းမ်က္ခုံးလႈပ္သြားမွာ
    အမွန္ပါ။ ဘာလုိ႔လဲဆုိေတာ့ iphone, ipad ေတြကုိ ျပန္သုံးရဖုိ႔အတြက္
    jailbreak လုပ္ရလုိ႔ပါပဲ။ android phone မွာ အဲ့ဒါေတြမလုိပါဘူး။
    ႀကိဳဳက္သလုိသြား၊ ႀကိဳက္တာ install လုပ္လုိ႔ရပါတယ္။ ကဲအဆင္ေျပမယ္လုိ႔
    ေမွ်ာ္လင့္ပါတယ္။ android သမားမ်ားအတြက္ မရွာခ်င္ရင္ေတာ့ ေအာက္မွာ
    တင္ေပးလုိက္ပါၿပီ။ ျမန္မာႏုိင္ငံက အင္တာနက္ရွိတဲ့ဖုန္း၊
    အင္တာနက္လုိင္းရတဲ့ေနရာကေန ဖုန္းကတဆင့္ ကၽြန္ေတာ့္ဖုန္းကုိ
    လွမ္းဆက္လုိ႔ရပါတယ္။ +66862735597 ပါ။ ရတယ္ဆုိရင္ စမ္းေခၚလုိက္ပါ။ phone
    number ထည့္လုိက္တာနဲ႔ ကုိ႔သူငယ္ခ်င္းေတြထဲမွာ viber ထည့္ထားတယ္ဆုိရင္
    viber ပုံေလး ဖုန္းနံပါတ္နေဘးမွာ ေပၚေနပါတယ္။ ဘယ္သူထည့္ထားလဲ
    ၾကည့္လုိ႔ရပါတယ္။ ေမးစရာမလုိပါဘူး။

Wednesday, July 4, 2012

Youtube in (FreeTwitTube.com) thak khat kipan


Youtube ah video i et ciang in tua video nuai lam ah, comment tawh akikal ah FreeTwitTube.com BETA ci in nasepna thak khat hong kipan ta uh hi. Tua in youtube tawh akihong video khat i thulu tawh akinai thei pen ding in video dangte twitter link pan in kaikhawm in hong suaksak ding ahi hi. Hih FreeTwitTube.com tuni mah in aki zangpan suak a, hih vai ah a tamzaw in na sim nop leh a website ah nana pai in. A tung a limlahna pen a nuai a URL sung a bang in hong suakkik ahi hi.
http://www.youtube.com/watch?v=HUPfkNXpZvQ

Google Mail security a om nading in (2-step verification)

 
Email password hong ki guksak, mun dang pan hong ki honsim sak cih bang a tuamtuam kiza gige den hi. Tua pen lawmta khat, nupa khat, innkuan khat leh theih ngeilo mi nawngkaisak nuam (hacker) te a kipan in email password hong guksak in, hong laih sak thei hi. Tuabang a om theihloh nading in Google Mail ah 2-steps verification zat theih ahi hi. A nasep zia pen eima zat ngei computer khat ah khat vei emal i login leh tua pen (remember in this PC) icih kei leh login i bawl sim in i mobile phoen ah code hong tung ding a, tua code zang kik in email aki login thei pan ding ahi hi. Computer dang khat, internet kizat theihna device dang (phone, ipad etc.) i zat sim in i register i bawlna i phone sung ah code hong tung gige den ding a tua code tawh login thuah ding kisam hi in, security ding in hoih mahmah hi.
Mi khat peuh in na password hong etsim sak kha phial leh zong na phone tawh a nih in hong guksak khop kei buang leh na email en theilo ding cihna hi. Hacker a tamzaw pen innveng khat, lawmta khat cih sang in, gam dang, mundang pan ki "hack" sak tamzaw tham hi. Tua ahih man in 2-way verification zatna hang in na email hong ki honsim sakna ding pan in tampi in hong dal ahih man in, email thupi a zang Gmail leh Google Apps email a zang gtn. @zocia.org, @zomi.net etc. in zong hih 2-step verification zat huai hi.

Manglai in akicing zaw in a nuai ah kien thei hi

2-step verification adds an extra layer of security to your users' Google Apps accounts by requiring them to enter a verification code in addition to their username and password, when signing in to their account.
The Google Apps Service Level Agreement does not apply to any services used in connection with 2-step verification if the verification process relies on third-party voice or data providers to deliver the verification code.

Why should I enable 2-step verification for my domain?

2-step verification helps protect a user's account from unauthorized access should someone manage to obtain their password. Even if a password is cracked, guessed, or otherwise stolen, an attacker can't sign in without access to the user's verification codes, which only the user can obtain via their own mobile phone.

Requirements

Note: If you're an API developer using ClientLogin authentication, read API Developers before enrolling in 2-step verification.

How it works

  1. You enable 2-step verification for your domain in your Google Apps control panel. See Setup 2-step verification for your domain for how to enable 2-step verification for your account. We recommend that you notify your users of this new security process and include instructions on how to get started.

    Note: Although users must opt-in to 2-step verification themselves, you may require them to do so by enforcing the setting on the Settings > Security tab. Do not make this change until all users have opted in, or they will be locked out of Google Apps. See the Enforcement article for instructions.
     
  2. The user enrolls in 2-step verification, and selects the method for receiving their verification code on their mobile phone: the Google Authenticator app, text message, or phone call. How quickly they get their code via text message or phone call depends on their service provider and location. We recommend users with smartphones to use the Google Authenticator app which can generate codes without a network connection.

    See Set up 2-step verification for your Google Account.

    • If this link doesn't take you to the 2-step verification page, you need to follow these steps:

      1. Sign in to your Google Apps Gmail Account and click Settings (in the top right corner).
      2. Under the Accounts tab, click Google Account settings.
      3. Under Personal Settings, click Using 2-step verification
      4. Follow the steps in the 2-step verification guide to set up 2-step verification.

    Administrators can point users to Getting started with 2-step verification for step-by-step instructions.
     
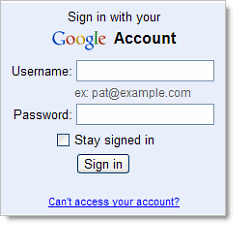
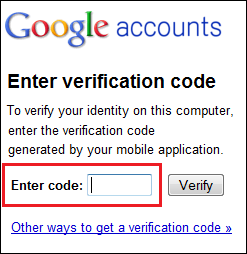
  3. The next time the user signs in to their Google Apps account on a new browser or device, they enter their username and password as usual. They're then prompted with a second page to enter a verification code. When your user checks Remember verification for this computer, they're only prompted to enter a verification code once every 30 days per browser or after deleting their browser's cookies. Your users should not check this if they're at a public or shared computer.


  4. Depending on how they opted to receive their code, the user gets their time-based, one-time code from the Google Authenticator app on their smartphone or via text message or phone call. They then enter the code to successfully sign in.

Signing in to mobile devices with application-specific passwords

Once your users enroll in 2-step verification, they may need to use application-specific passwords in addition to their verification codes. For installed applications that don't have a 2-step verification field, your users will need to enter an application-specific password once per device or application in place of their regular password to access their Google Account.
Common devices and applications that require application-specific passwords are: Gmail and Google Calendar on Android-based phones, ActiveSync for Windows Mobile and iPhone, and IMAP clients such as Thunderbird. See Sign in to mobile or desktop apps for more details.
Remember that good security practices are critical to the integrity of your user's Google Account. Learn more at Keeping your account secure.

Hosted Apps Retirement

We wanted to be sure you were aware of some upcoming changes to the SourceForge project hosting service. One or more of your projects use the Hosted Apps service. On September 1,2012, the Hosted Apps service will reach the end of its life and be shut down. The reasons for this are discussed in the blog post, at http://sourceforge.net/blog/hosted-apps-retirement/  and in the wiki, at https://sourceforge.net/p/forge/community-docs/Hosted%20Apps%20Retirement/

Over the coming days, we'll be publishing more documents about how to migrate your apps to your own project web space, so that none of your data is lost in this transition. We want to be sure that your project can continue to operate without interruption, so if you have any concerns, difficulty with migration, or just want to chat, please send us a note(communityteam@sourceforge.net).
Please watch the wiki page(https://sourceforge.net/p/forge/community-docs/Hosted%20Apps%20Retirement/)for further updates about this process. We'll be back in touch as it gets closer to the deadline, or if anything about the plan changes. Thanks again for being part of the SourceForge community.
----------------------------------------------------------------------SourceForge.net has made this mailing to you as a registered user of the SourceForge.net site to convey important information regarding your SourceForge.net account or your use of SourceForge.net services. We make a small number of directed mailings to registered users eachyear regarding their account or data, to help preserve the security of their account or prevent loss of data or service access. 
If you have concerns about this mailing please contact our Supportteam per: http://sourceforge.net/support

Tuesday, July 3, 2012

Android Phone ရဲ႕ Internet ကို Wifi ျပန္လြင္႕ဖို႕ (WiFi HotSpot / WiFi Tether 1.7)


                  ကၽြန္ေတာ္တို႕ ျမန္မာနိုင္ငံမွာ ဖုန္းနဲ႕ အင္တာနက္ အသံုးျပဳၾကတာ နည္းနည္းေလးတြင္က်ယ္
လာပါျပီ။ ဖုန္းမွာရွိတဲ႕ အင္တာနက္ကို ဖုန္းနဲ႕ မသံုးခ်င္လို႕ Laptop မွာလည္း သံုးလာၾကပါျပီ။ တခ်ိဳ႕ဖုန္း
ေတြမွာ wifi ျပန္လြင္႕နိုင္တဲ႕ Function ပါမလာပါဘူး။ ဒါေၾကာင္႕Phone မွတဆင္႕ Wifi ျပန္လြင္႕ႏိုင္ဖို႕အ
တြက္ WiFi HotSpot / WiFi Tether 1.7 ဆိုတဲ႕ Android application ေလးတစ္ခု မွ်ေ၀ေပးရျခင္းျဖစ္ပါ
တယ္ဗ်ာ။Android Phone တိုင္းေတာ႕ သံုးလို႕ရမွာမဟုတ္ပါဘူး။ Android v2.2 အထက္မွသာအသံုးျပဳနိုင္
မွာျဖစ္ပါတယ္ဗ်ာ။
လိုအပ္မယ္ဆိုရင္ေတာ႕ ေအာက္က Link မွာေဒါင္းယူသြားနိုင္ပါတယ္ဗ်ာ။ အားလံုးဘဲ
အဆင္ေျပၾကပါေစဗ်ာ။


https://blogger.googleusercontent.com/img/b/R29vZ2xl/AVvXsEiq1N1eYeMw0P2MUrxso_Y6oPuQpeSH4krew4QDKNBEGuyd_3C-doHNt7aSDAJajdrXGiNiuc7_xZJbtK3SUz6BXMWfqnrqkm_lRGeD6-EvGLtOZ4JxpVyjfuV49S8-6lgzB7Ke8icmsV4/s1600/1.Download+Here.gif


Sunday, July 1, 2012

The Master List for New Mac Users (2)

iPhoto
Quickly Organize All Your Photos
View and Enjoy Your Photos
Introducing iPhoto '08 - Atomic Learning
Customizing the toolbar - Atomic Learning
Improving Your Photos

Sharing Your Photos
iPhoto Book to Movie - Murphy Mac
Creating Photo Gifts and Keepsakes


iMovie '08
One Place for All Your Video
Introducing iMovie '08 - Atomic Learning

Reviewing Your Video
Rating Video -Apple
Making Movies
Adding Music -Apple
Adding Titles -Apple
Sharing Your Movies

Advanced Techniques

iDVD
Creating a DVD from Your Videos, Photos, and Music
Understanding the interface - Atomic Learning
Planning a project - Atomic Learning

iWeb
Easy, Flexible Website Design


Add Photos and Movies to Your Site


Express Yourself with Blogs and Podcasts


Publish and Manage Your Website

iTunes
Jukebox
iTunes Drag and Drop - Murphy Mac
Convert to MP3 - Murphy Mac
iTunes tips - Macworld Video

Store

Syncing


Odds and Ends
Open this. With that. - Murphy Mac
Automator - ScreenCastsOnline
Automator video tutorial -TechnoFodder
Growl - Murphy Mac

The Master List for New Mac Users (1)

Mac Basics
Move to Mac - Apple
Introducing stacks - Atomic Learning
Changing Desktop Picture - MacProVideo
Recording A Disc Image - MacProVideo
Working with Expose - MacProVideo
Changing User Icon - MacProVideo
Display Data - VTC
Finder View - Switching2Mac
Cover Flow & Quick Look - Switching2Mac
Installing Applications - Switching2Mac
Cocoa Dictionary - Murphy Mac
In the Corner - Murphy Mac
Tweak Your Toolbar - Murphy Mac
Leopard 10.5.2 and Spaces - ScreenCastsOnline
Setting Up Your Mac - Part 1 - ScreenCastsOnline
Setting Up Your Mac - Part 2 - ScreenCastsOnline
Leopard - Time Machine - ScreenCastsOnline
OS X productivity tips - Macworld Video
Inside Mac OS X 10.5.2 - Macworld Video
Finder's hidden powers - Macworld Video
10 tips to be thankful for - Macworld Video
Leopard Gems - Macworld Video
Favorite Leopard Features - Macworld Video
Switching from Windows
Parallels Desktop for Mac - ScreenCastsOnline


Dashboard
Widget Cleanup - Murphy Mac

Wireless

Mail
Setting up your email accounts - Atomic Learning
Working with passwords - Atomic Learning
Importing email into Mail - Atomic Learning
Choosing an email format - Atomic Learning
RSS in Mail - Apple
Address Book
Adding notes to a contact - Atomic Learning
iChat


Safari
Browser Wars: Game On - Murphy Mac
Google Special Queries - Murphy Mac
Dragging Tabs and URLs - Murphy Mac
RSS in Safari - Murphy Mac
Safari tips - Macworld Video
Safari 3 - Macworld Video
PDFs in Safari - Apple
Surf Faster - Apple