သမိုင္​း

Theme images by Storman. Powered by Blogger.

Text Widget

Sports

Gadgets

Blog Archive

Travel

Definition List

Sunday, February 27, 2011

Photoshop သင္ခန္းစာ E-Book

ဤသင္ခန္းစာမ်ားကိုေလ့လာရာတြင္ အခက္အခဲမ်ားရွိႏိုင္ပါသည္။ အလံုးစံုျပည့္စံုမႈမ်ားမရွိႏိုင္သည္ကို နားလည္ခြင့္လြတ္ေပးပါရန္ ဦးစြာတင္ျပအပ္ပါသည္။ သင္ခန္းစာအမ်ားစုမွာ Photoshop အား အေျခခံအထိတတ္ထားလွ်င္ ပိုမိုသင့္ေတာ္ပါသည္။ အေျခခံလံုး၀မရွိသူမ်ားႏွင့္ မသင့္ေလ်ာ္ပါ။ ေလ့လာသူအား တစ္စံုတစ္ခုေသာအတိုင္းအတာထိ အက်ိဳးျပဳႏိုင္လိမ့္မည္ဟု ေမွ်ာ္လင့္မိပါသည္။ အထူးေက်းဇူးတင္ရွိပါသည္။


အပိုင္း(၁)
Basic Concepts

1. ပံုရိပ္မ်ားရဲ႕ဖြဲ႕စည္းပံုသဘာ၀
2. အေရာင္မ်ား
3. Photoshop's File Formats မ်ားအေၾကာင္း
4. အလင္းအေမွာင္ကိုသံုး၍ထုမ်ား ဖန္တီးျခင္း
5. ဖန္ျပားပံုသ႑ာန္မ်ား ဖန္တီးျခင္း
6. Layer Mask မ်ားအေၾကာင္း
7. Anti-aliasing
8. အို... အရိပ္ေလးရယ္
9. Layers in CS2
10. Fading the effect
11. The art of Pattern (Part 1)
12. The art of Pattern (Part 2)
13. The art of Pattern (Part 3)
14. Layer Mask Blending
15. တစ္စကၠန္႔ပဲလိုတယ္ (သို႔) Actions
16. Operation of Selections
17. Photoshop Brushes
18. ညအခါ လသာသာ
19. Grayscale and Monochrome
20. Hair Selection
21. Layer ေတြကို အေျဖရွာၾကမယ္
22. Sharpen the image
23. ပံုရိပ္တြင္ Focus ဖန္တီးျခင္း
24. စာ႐ြက္ေဟာင္းေလး
25. Perspective Crop
26. Logo ေကာင္းတစ္ခုျဖစ္ဖို႔ဆိုရင္
27. Logo တစ္ခုကိုဖန္တီးျခင္း
28. Photo Repairing Guide (Part 1)
29. Photo Repairing Guide (Part 2)
30. Barcode maker


အပိုင္း(၂)
Applied

31. AutoCAD Drawing file မ်ားအား Photoshop သို႔ ကူးေျပာင္းျခင္း
32. AutoCAD Drawing file မ်ားအား Photoshop သို႔ ကူးေျပာင္းျခင္း ( Using Distiller Printer)
33. AutoCAD Landscape Library အတြက္ Custom Context မ်ားဖန္တီးျခင္း
34. AutoCAD Elevation တစ္ခုအား အေရာင္ျဖည့္သြင္းျခင္း
35. မဂၤလာခန္း (သို႔) Custom Furniture မ်ားဖန္တီးျခင္း
36. Using image printer


အပိုင္း(၃)
Special Effects

37. ဘီယာေအးေအးေလးတစ္ခြက္
38. Space Lighting Effects
39. Abstract Effects
40. Lighting Effects
41. Standup Effects
42. ဘယ္ပန္းခ်ီေရးလို႔မမီ
43. ဘ၀အပိုင္းအစမ်ား
44. အထဲမွာမေနခ်င္တဲ့သူ
45. မီးေတာက္အသြင္
46. ေရလိုေနတယ္
47. Nature 1 (ဘုရာစူး မိုးႀကိဳးပစ္)
48. Hazel Nut ပူပူေလး
49. Nature 2 (ႏွင္းေ၀တဲ့ေဆာင္း)
50. ပန္းခ်ီကားတစ္ခ်ပ္အား အသက္သြင္းျခင္း
51. Scan Line Pattern
52. သႀကၤန္မိုး
53. ဆံေကသာေရာင္ဆန္းမ်ား
54. ေဆးေရာင္လွလွျခယ္ရေအာင္
55. ကာတြန္း႐ုပ္ေလး
56. နတ္သမီးေလးလို လွေနလို႔
57. ေဟာင္းႏြမ္းသြားတဲ့ေနာက္
58. ႏူးညံ့ေက်ာ့ရွင္း လွယမင္း
59. Mirror Effect 1
60. Mirror Effect 2
61. Mirror Effect 3 (ေရေပၚ အရိပ္ထင္)
62. Color Burn (လွပစြာ ေလာင္ကၽြမ္းျခင္း)
63. သင္းပ်ံ႕တဲ့ အမွတ္ရစရာေတြ
64. Auto-Align & Blend Layers (CS3)
65. SumoPaint: Online Image Editor
66. ပံုတူပြားျခင္းနဲ႔ ပတ္သက္၍
67. Overlay ႏွင့္ အပ်င္းေျပ

အပိုင္း(၄)
Text Effects

68. 3D Text
69. Metal Text
70. ေ႐ႊအိုေရာင္လို မႈန္းတဲ့စာသား
71. အဖန္ဖန္မွန္
72. သတိ၊ ဓါတ္လိုက္တတ္သည္
73. ေအးတိေအးစက္ ေရခဲ Text
74. ဆယ့္ကိုးဇူလိုင္ မေမ့ႏိုင္

အပိုင္း(၅)
Animations

75. More about GIF
76. Animation Method 1 (Frames from Layers)
77. Animation Method 2 (Tweening) Part 1
78. Animation Method 2 (Tweening) Part 2
79. Animation Method 2 (Tweening) Part 3
80. ႐ႈပ္႐ႈပ္ရွက္ရွက္ GIF Animation Text
81. ေဖာင္း ၀ ႀကီး Animation Text
82. Animation ads
83. Wipe Transition
84. Dissolve Transition

Photoshop အေျခခံအထိတတ္ထားရန္ ဒီမွာ Downloads ရယူပါ။
AdobePhotoShop7.0.pdf

ေအာက္မွာ Downloads ရယူပါ။
1. PhotoshopLessonIndex.doc
2. PhotoshopLesson1-50.doc
3. PhotoshopLesson51-100.doc
4. PhotoshopLesson101-150.doc
5. PhotoshopLesson151-200.doc
6. PhotoshopLesson201-250.doc
7. PhotoshopLesson251-300.doc
8. PhotoshopLesson301-350.doc
9. PhotoshopLesson351-400.doc

Friday, February 18, 2011

10 Secrets of USB Thumb Drive


Hard Disk မွာ ေနရာလြတ္ နည္းပါးေနသူေတြအတြက္ အလုပ္မွအိမ္၊ အိမ္မွေက်ာင္း၊ အခ်က္အလက္ သင္ခန္းစာ၊ အလုပ္ဖုိင္ေတြကို သယ္ေဆာင္သြားလုိသူေတြအတြက္၊ စနစ္တစ္ခုလုံးကို လုံၿခဳံစိတ္ခ်မႈျပည့္၀စြာ အလုပ္လုပ္လုိၿပီး အစီအစဥ္တက် ရွိလုိသူမ်ားအတြက္ USB Thumb Drive ရဲ႕ လွ်ဳိ႕၀ွက္ခ်က္ေလးမ်ားကို စုစည္းေဖာ္ျပ လုိက္ပါတယ္။

1. USB Drive ကုိ icon အေနနဲ႔ သုံးႏုိင္ပါတယ္
တကယ္လုိ႔ ကြန္ပ်ဴတာမွာ USB Hub တစ္ခုကုိ ထားရွိသုံးစဲြမယ္ဆုိရင္၊ ေနာက္ၿပီး USB အမ်ားႀကီးနဲ႔ Multiple USB port ေတြ ထားရွိ သုံးစဲြမယ္ဆုိရင္ အမ်ဳိးမ်ဳိး အစားစားကဲြျပားတဲ့ ကုိယ့္ရဲ႕ USB ကုိ icon ေတြအေနနဲ႔ ေဖာ္ျပ ေပးထားႏုိင္ပါတယ္။ အဲဒီလုိ ေဖာ္ျပေပးတဲ့ XP, Vista, Windows 7 ေတြမွာ ပါ၀င္တဲ့ custom icon ေတြကို အသုံးျပဳၿပီး folder ေတြကို icon ပုံစံခ်ိန္းတဲ့ ပုံစံမ်ဳိးအဆင့္ပဲ လြယ္လြယ္ကူကူ ရွိပါတယ္။ ပထမဦးဆုံးအေနနဲ႔ (.ico) format ကုိ drive ထဲမွာ အရင္ ေမာင္းထည့္ရပါမယ္။ အကယ္၍ web application တစ္ခုျဖစ္တဲ့ convert icon ကုိ အသုံးျပဳလည္း ရပါတယ္။ icon ကုိ အမ်ဳိးအစားကဲြျပားစြာနဲ႔ USB မွာ ရည္ညႊန္းေဖာ္ျပေပးမွာ ျဖစ္တဲ့အတြက္ ဘယ္ USB က ဘာ file ေတြ ပါ၀င္တယ္ဆုိတာ အလြယ္တကူ သိရွိရမွာပါ။

2. Google ၏ OS ကုိ အိတ္ထဲ ထည့္ထားႏုိင္ပါတယ္
Google ၏ OS ျဖစ္တဲ့ Chrome OS ကုိ USB drive ထဲမွာ ထည့္သြင္းၿပီး ကုိယ့္ကြန္ပ်ဴတာရဲ႕ ဒုတိယ OS အျဖစ္ ထားရွိ သုံးစဲြႏုိင္ပါတယ္။ အလြန္ျမန္ဆန္ၿပီး ကုိယ့္စိတ္ႀကိဳက္ custom ျပဳလုပ္ထားႏုိင္ပါတယ္။ ဒီဇုိင္း အဆင္အျပင္ေတြကအစ ပါ၀င္တဲ့ coding ေတြကို သြားျပန္ၿပီး ျပင္ဆင္ေရးသားႏုိင္တဲ့ open source OS တစ္ခု ျဖစ္ပါတယ္။

3. Democra key ျဖင့္ လုံၿခဳံစိတ္ခ်စြာ အလုပ္လုပ္သုံးစဲြႏုိင္ပါတယ္
တကယ္လုိ႔ USB drive ကုိျဖစ္ေစ၊ PC ကုိျဖစ္ေစ သုံးစဲြရတာ ကုိယ့္ရဲ႕ကုိယ္ေရး အခ်က္အလက္ေတြနဲ႔ ကုိယ္ေရး ကုိယ္တာဖုိင္ေတြ မလုံၿခဳံဘူးလုိ႔ ခံစားရရင္ Democra Key ကုိ download ရယူ၍ windows platform ေတြေပၚ မွာ အလုပ္လုပ္ႏုိင္ေသာ web application တစ္ခုလုိ သုံးစဲြႏုိင္ပါတယ္။ အဲဒီအထဲမွာ ပုံရိပ္တည္းျဖတ္တာေတြ၊ email ဖြင့္စစ္တာေတြ၊ ကုိယ္ေရးကုိယ္တာ အခ်က္အလက္ေတြကို encrypt ျပဳလုပ္တာေတြနဲ႔ Internet ကုိ browse လုပ္တာေတြ ျပဳလုပ္ႏုိင္ပါတယ္။ လုံၿခဳံမႈအျပည့္အ၀ ရွိပါတယ္။

4. XBMC Media Center ကုိ ထည့္သြင္းထားႏုိင္ပါတယ္
ကုိယ့္ PC မွာ WMP player နဲ႔ အျခား player မ်ားစြာရွိေပမယ့္ XBMC live ကုိ ရယူၿပီး drive ထဲကုိ ထည့္သြင္း ထားမယ္ဆုိရင္ netbook မွာပဲျဖစ္ျဖစ္၊ laptop မွာပဲ ျဖစ္ျဖစ္ media file ေတြကို အလြယ္တကူ ၾကည့္႐ႈခံစား ႏုိင္ပါတယ္။ အဲဒီအထဲမွာ အလြယ္တကူနဲ႔ လုပ္ေဆာင္ႏုိင္တဲ့ လုပ္ေဆာင္ႏုိင္တဲ့ လမ္းညႊန္ခ်က္ေတြကို သင္ခန္းစာ ဖုိင္ေတြအေနနဲ႔ ၾကည့္႐ႈၿပီး လုိက္လံလုပ္ေဆာင္ႏုိင္ပါတယ္။

5. Windows System တစ္ခုလုံးကို save လုပ္ထားႏုိင္ပါတယ္
တကယ္လုိ႔ Thumb drive ထဲမွာ Ubuntu စနစ္တစ္ခုလုံးကုိ ထည့္သြင္းထားမယ္ဆုိရင္ windows ရဲ႕စနစ္မွာ မွားယြင္းေနတဲ့အမွားေတြ၊ error ေတြ အားလုံးကုိ ubuntu ကတစ္ဆင့္ boot လုပ္ၿပီး ၀င္ေရာက္ၾကည့္႐ႈရင္း ျပင္ဆင္ႏုိင္ပါတယ္။ ထုိ႔အတြက္ ပုန္းေအာင္းေနတဲ့ ဖုိင္ေတြ၊ ဖုိင္ေယာင္ေဆာင္ထားတဲ့ virus ေတြကုိ အလြယ္ တကူ ၾကည့္႐ႈသတ္ပစ္ႏုိင္ၿပီး drive space ကုိ သန္႔သန္႔ရွင္းရွင္း analyze လုပ္ႏုိင္ပါတယ္။ Partition လုပ္တာ ေတြ၊ windows password ေတြကို ျပန္ေခၚတာနဲ႔ ေပ်ာက္ဆုံးေနတဲ့ file ေတြကို ျပန္လည္ရွာေဖြတာေတြ ျပဳလုပ္ ႏုိင္ပါတယ္။ လုပ္ေဆာင္ပုံ နည္းအေသးစိတ္ကို lifehacker.com မွာ ၾကည့္႐ႈႏုိင္ပါတယ္။

6. USB Drive ကေနတစ္ဆင့္ Windows စနစ္တစ္ခုလုံးကို အမိန္႔ေပး ထိန္းခ်ဳပ္ႏုိင္ပါတယ္
Windows ျပန္လည္စတင္ခ်ိန္မွာ USB drive ကေန log off လုပ္တာေတြ၊ shut down လုပ္တာေတြကုိ USB drive ရဲ႕ click ကုိ ႏွိပ္လုိက္တာနဲ႔ အထဲထဲမွာ အမိန္႔ေပး file ေတြကို တန္းစီၿပီး ထည့္သြင္းဖုိ႔အတြက္ coding ေတြ လြယ္လင့္တကူ ရွိပါတယ္။

7. သယ္ေဆာင္ရ လြယ္ကူေသာ Windows Suite တစ္ခုလုံးကို ထည့္သြင္းသြားႏုိင္ပါတယ္
Portableapps.com မွာ ေရႊ႕ေျပာင္းသယ္ယူရလြယ္တဲ့ software ကေလးေတြ၊ ဥပမာ Photoshop, acrobat reader, firefox, gtalk စတဲ့ software ကေလးေတြကို download ရယူၿပီး USB drive ထဲ ထည့္ထားမယ္ ဆုိရင္ windows အတြက္ ေနရာလြတ္ေတြမ်ားစြာ ထြက္ေပၚလာေစပါမယ္။ Memory အရမ္းစားတဲ့ software ေတြ ဆုိလုိ႔ရွိရင္လည္း memory အစား သက္သာသြားပါမယ္။ ဒါ့အျပင္ ႐ုံးက ကြန္ပ်ဴတာမွာ ကုိယ္လုိခ်င္တဲ့ software မရွိလုိ႔ အိမ္ျပန္အလုပ္လုပ္လုိ႔ မရတဲ့သူေတြအတြက္လည္း အခ်ိန္ကုန္သက္သာ သြားေစပါတယ္။ Portable software ေတြဟာ software ႀကီးေတြက လဲြလုိ႔ function အစုံအလင္ ပါရွိၿပီး ပုံမွန္အတုိင္း အလုပ္ လုပ္ႏုိင္ပါတယ္။

8. USB Drive ထဲမွာ အေရးႀကီး Data ေတြကို ထားရွိႏုိင္ပါတယ္
တစ္ခ်ဳိ႕ မိသားစုနဲ႔ ပတ္သက္တဲ့ ကုိယ္ေရးကုိယ္တာဖုိင္ေတြ၊ ကုိယ့္ရဲ႕ အႀကံအစည္နဲ႔ ပတ္သက္တဲ့ idea စိတ္ကူး ေတြကုိ USB drive ထဲကုိ ထည့္သြင္းထားၿပီး အဲဒီ USB ကုိ USB safeguard သုံးစဲြလုိက္မယ္ဆုိရင္ USB ကုိ လက္လြတ္စပယ္ ထားခဲ့မယ္ဆုိတာေတာင္မွ ကုိယ့္ဖုိင္ကုိ ၀င္ၾကည့္တဲ့အခါမွာ password ေတာင္းတာမ်ဳိးေတြ၊ ဖုိင္ကုိ ၀ွက္ထားတာမ်ဳိးေတြ၊ ဖုိင္ပုံစံ ေဖ်ာက္ထားတာမ်ဳိးေတြ လုပ္ထားႏုိင္တဲ့အတြက္ အဆင္ေျပပါတယ္။

9. လုိခ်င္တဲ့အခ်ိန္ေတြမွာ ဖုိင္ေတြကို ေရႊ႕ေျပာင္းႏုိင္ပါတယ္
USB drive နဲ႔ hard drive ၾကားထဲမွာ ဖုိင္ေတြကို ေရႊ႕ေျပာင္းတာ အလြန္လြယ္ကူပါတယ္။ USB ရဲ႕ နည္းပညာ ျမင့္မားရင္ ျမင့္မားသလုိ ေရႊ႕ေျပာင္းရ လြယ္ကူၿပီး ျမန္ဆန္ပါတယ္။ တကယ္လုိ႔ internet မွာ နာမည္ႀကီးေနတဲ့ ဖုိင္တင္တဲ့ upload sharing site ျဖစ္ၿပီး application မွာ ထုတ္ေပးထားတဲ့ drop box နဲ႔ဆုိရင္ USB ထဲက ဖုိင္ ေတြကို အဲဒီထဲထည့္တာေတြ၊ Online ေပၚမွာ ၾကည့္႐ႈေနတဲ့အခ်ိန္မွာ ႐ုံးကေနတစ္ဆင့္ drop box ထဲ ထည့္သြင္းသိမ္းဆည္းထားၿပီး အိမ္ကေနတစ္ဆင့္ အလြယ္တကူ ျပန္လည္ၾကည့္႐ႈႏုိင္ပါတယ္။

10. Linux OS ကုိ USB Drive ထဲ ထည့္သြင္းထားႏုိင္ပါတယ္
Linux အႏြယ္၀င္ OS ေတြဟာ virus အႏၱရာယ္ကင္းရွင္းေစၿပီး သုံးစဲြရ လြယ္ကူတဲ့အျပင္ အခုဆုိရင္ ေရႊ႕ေျပာင္း သယ္ေဆာင္ရ လြယ္ကူတဲ့ Portable Linux OS ေတြပါ ထြက္ရိွလာတဲ့အတြက္ drive ထဲကုိ ထည့္သြင္းထားၿပီး အလုပ္လုပ္တဲ့အခါမွာ- ဥပမာ ႐ုံးမွာ virus ေတြ အလြန္ကုိက္ေနတဲ့အတြက္ ႐ုံးက virus ေတြ အိမ္က ကြန္ပ်ဴတာကုိ ပါလာမွာ စုိးရိမ္ေနသူမ်ားအတြက္ အလြန္ အသုံး၀င္ၿပီး ႐ုံးမွအိမ္၊ အိမ္မွ႐ုံး USB drive မွတစ္ဆင့္ လြယ္ကူစြာ အလုပ္လုပ္ႏုိင္မွာ ျဖစ္ပါတယ္။
Source: NetGuide_ 6 November 2010

Mac|Life - March 2011 [Magazine]


Mac|Life - March 2011
PDF | 100 pages | 26.7 Mb | English

Mac|Life provides exclusive, authoritative information and advice for readers who want to get the most out of their Macs, iPods, and third-party hardware, software, and services. The magazine also delivers informative feature articles showcasing the latest hardware and software, an expanded "how-to" section, and candid reviews of the latest gear.

Download links:

Depositfiles.com
http://depositfiles.com/files/1p2jo9k5c

Hotfile.com
http://hotfile.com/dl/104844876/208cc9e/maclife201103.pdf.html

Pc Pro - No.198 [Magazine - April 2011]


Pc Pro - No.198 (April 2011)
PDF | 173 pages | 76 Mb | English

PC PRO - reviews of laptops, PCs, digital cameras, printers, software, peripherals, components and more. Plus technology news and opinion.

Download links:

Depositfiles.com
http://depositfiles.com/files/l3d20pkan

Hotfile.com
http://hotfile.com/dl/104787320/fcdad5c/pc-pro-2011-04-apr.pdf.html

Bypass for Myanmar

ျမန္မာႏိုင္ငံရွိ ဘမ္ေက်ာ္သားမ်ားအတြက္ပါ.....ၾကိဳက္တာနဲ႔ေက်ာ္ၾကပါ။

FluffyProxy.Info
LinkUbator
Golden Hider.InfoWolveGa.TKTo use this Proxy, wait a minute showing in the page.
Lysurf
Speed Proxy
Fresh Ip
Premium Web Proxy
Proxy Admin
Free Web ProxyTo use our service is easy, you can just need type the blocked website url like google.com in the input field above and click Go!
Fast Glype Proxy
IESurfTo use our service is easy, you can just need type the blocked website url like google.com in the input field above and click Go!

ေရစိုဒဏ္ ခံႏိုင္တဲ့ A. DATA Flash Drive S- 101


Flash Drive ရဲ႕ Cover ကို သားေရနဲ႔ ဖြဲ႕စည္းထားတဲ့အတြက္ ေရစိုဒဏ္ခံႏိုင္တဲ့ A DATA Flash Drive S- 101 အမ်ဳိးအစားပဲ ျဖစ္ပါတယ္။ ေသးငယ္ၿပီး ေပါ့ပါးတဲ့အတြက္ အလြယ္တကူ သယ္ေဆာင္အသံုးျပဳ ႏိုင္ပါတယ္။
Flash Drive ကိုဖြင့္ပိတ္ရာမွာ ခလုတ္နဲ႔တြန္းထုတ္ရတဲ့စနစ္ ပါဝင္တဲ့အတြက္ အဆင္ေျပေစၿပီး အဖံုးေပ်ာက္မွာကို စိုးရိမ္စရာ မလိုေတာ့ဘူး။
Micro Computer Co.,Ltd. မွ တင္သြင္းျဖန္႔ခ်ိတာျဖစ္ၿပီး ပစၥည္းအာမခံသက္တမ္း တစ္ႏွစ္ေပးထားပါတယ္။ တစ္ႏွစ္အတြင္း ခ်ဳိ႕ယြင္းခဲ့ပါက အသစ္တစ္ခုနဲ႔ျပန္လည္ လဲလွယ္ေပးမွာျဖစ္ပါတယ္။ ေစ်းႏႈန္းက က်ပ္ ၁၁၂၀၀ ဝန္းက်င္နဲ႔ ကြန္ပ်ဴတာပစၥည္း အေရာင္းဆိုင္မ်ားမွာ ဝယ္ယူရရွိႏိုင္ပါတယ္။

Sunday, February 13, 2011

Create personal Proxy Server

ဒီpostကေတာ့ Banned Websiteေတြကို ၀င္ႏိုင္တဲ႔ နည္းလမ္း(၁၀)ခု ထဲက ၉ ခုေျမာက္ နည္းလမ္းကို အေထာက္အကူျပဳေစႏိုင္ဖို႔ျဖစ္ပါတယ္။ ဒီနည္းလမ္း နံပါတ္ ၉ ဟာ အျခား နည္းလမ္းေတြထက္သာလြန္တဲ႔ အခ်က္ေတြ ရွိေနပါတယ္။ ပထမအခ်က္အေနနဲ႔ free public proxy ေတြဟာ ဘယ္ေတာ့မွ safe မျဖစ္ပါဘူး ။ အဲဒီ serverေတြက သင့္ရဲ႕ ပုဂၢိဳလ္ေရးဆိုင္ရာေတြ၊ ကိုယ္ပိုင္သတင္းအခ်က္အလက္ေတြကို ထိခိုက္ေစႏို္င္သလို အဲဒီ server ေတြဟာ proxy software အသံုးျပဳျပီး block တာကိုလည္း ခံရႏိုင္ပါတယ္။ ေနာက္တခ်က္ကေတာ့ သင့္ကိုယ္ပိုင္ proxy server အသံုးျပဳျခင္းျဖင့္ သင္ကိုယ္တိုင္ အျပည့္အ၀ ထိန္းခ်ဳပ္လုပ္ကိုင္ႏိုင္တာပဲ ျဖစ္ပါတယ္။ ဒါ့အျပင္ သင္ browse လုပ္ခဲ႔တာကို ဘယ္သူမွမသိေစဖို႔အတြက္ သင့္ရဲ႕ traffic ကိုလည္း လွ်ိဳ႕ ၀ွက္ထားနိုင္ပါတယ္။

ဒီpost မွာေတာ့ Windows XP တင္ထားတဲ႔ computer တစ္ခုေပၚမွာ Http proxy server တစ္ခုဘယ္လိုျပဳလုပ္ႏိုင္သလဲ ဆိုတာကို ေဖာ္ျပထားပါတယ္။

အဆင့္ ၁ - Perl distribution ကို Download ျပဳလုပ္ျခင္း ႏွင့္ install ျပဳလုပ္ျခင္း
Active State site မွ Active Perl ရဲ႕ Windows x86 version ကို download ျပဳလုပ္ပါ။ က်ေနာ္ "C:\usr\" ထဲကို set လုပ္ဖို႔အတြက္ အၾကံေပးထားတာေတြကလြဲလို႔ က်န္တာေတြကို default configuration ထဲမွာပဲ install လုပ္ပါ။

အဆင့္ ၂ - Apache server ကို Download ျပဳလုပ္ျခင္း ႏွင့္ install လုပ္ျခင္း
Windows အတြက္ ေနာက္ဆံုးထြက္ရွိတဲ႔ Apache server ကို ဒီေနရာကေန download ျပဳလုပ္ပါ။ ၄င္းကို ဘယ္folder ရဲ႕ ေအာက္မွာမဆို HTTP port အေနနဲ႔ port 80 မွာ install လုပ္ပါ။ မ်ားစြာေသာ corporate ေတြဟာ port 80 access ကိုသာ ခြင့္ျပဳမွာျဖစ္တဲ႔အတြက္ port setting ဟာ 80 ျဖစ္ဖို႔အေရးၾကီးပါတယ္။ အကယ္၍ prot 80 နဲ႔ ျပဳလုပ္တဲ႔အခါမွာ error တစ္ခုခုျဖစ္ခဲ႔မယ္ဆိုရင္ ျဖစ္ႏိုင္ေျခရွိတဲ႔ အျခား တစ္ခုကို အသံုးျပဳသင့္ပါတယ္။ (အခ်ိဳ႕ ISP ( Internet Service Provider ) ေတြက port 80 မွာ host လုပ္ထားရင္ block လုပ္တတ္ပါတယ္။ အဲဒီအတြက္ port 443 မွာ host လုပ္သင့္ပါတယ္။ )

အဆင့္ ၃ - Apache server ကိုတြဲဖက္အသံုးျပဳႏိုင္ရန္ ျပင္ဆင္ျခင္း
ဒီအဆင့္မွာေတာ့ CGI ကို enable ျဖစ္ေစဖို႔အတြက္ Apache ကိုျပင္ဆင္ထားဖို႔လိုအပ္ပါတယ္။ httpd.conf ( apache ရဲ႕ subfolder conf ထဲမွာ တည္ရွိပါ။) ထဲမွာ #AddHandler cgi-script.cgi ကိုရွာေတြ႔ပါလိမ့္မယ္။ ၄င္း ေရွ႕ မွာရွိတဲ့ hash(#) ကိုဖယ္ရွားလိုက္ပါ။
http.conf ထဲမွာ string လုပ္ဖုိ႔အတြက္ "you set DocumentRoot to" ဆိုတာကိုရွာေတြ႔ပါလိမ့္မယ္။ ၄င္းရဲ႕ ေအာက္မွာ Option directive ေတြကို သင္ျမင္ရပါမယ္။ ၄င္းကို Options Indexes Inculdes FollowSymlinks SymLinksifOwnerMatch ExecCGI MultiViews သို႔ေျပာင္းလိုက္ပါ။

အဆင့္ ၄ - CGIProxy( nph-proxy) ကို Download ျပဳလုပ္ျခင္း နွင့္ install လုပ္ျခင္း
CGIProxy (nph-proxy0 ကို ဒီေနရာကေန download လုပ္ပါ။ ျပီးရင္ အဲဒီ file ကို nph-proxy.cgi ဆိုျပီး rename ေပးလိုက္ပါ။ အဲဒီေနာက္ Apache ရဲ႕ document root (htdocs) ထဲကို copy လုပ္ပါ။ ျပီးရင္ေတာ့ nph-proxy.cgi ထဲမွာရွိတဲ႔ ပထမဆံုးအေၾကာင္းကို #!C:\usr\perl\bin\perl.exe ဆိုျပီးေျပာင္းလဲလိုက္ပါ။
bin folder (httpd.exe) ထဲမွာရွိတဲ႔ Apache ကို start လုပ္ပါ။ အခုဆိုရင္ browser session တစ္ခုပြင့္လာျပီး http://localhost/nph-proxy.cgi ကိုညႊန္ျပေနပါလိမ့္မယ္။ အကယ္၍ သင္လုပ္ခဲ႔တာေတြ အားလံုး အိုေကမွာဆိုေျပမယ္ဆိုရင္ေတာ့ ေအာက္ကပံုမွာျပထားတဲ႔ အတုိင္းျမင္ေတြ႔ရပါလိမ့္မယ္။


သင့္home connection ရဲ႕ IP address ကိုရွာပါ။ command prompt ထဲမွာ ipconfig လို႔ ရိုက္ျခင္းအားျဖင့္ေတြ႔ႏိုင္ပါတယ္။ အခုဆိုရင္ေတာ့ office machine မွ http://IP ADDRESS/ ကို access လုပ္ပါျပီ။ proxy ပံုစံကို က်ေနာ္တို႔အထက္မွျမင္ေတြ႔ခဲ႔ရတဲ႔အတိုင္း သင္ျမင္ႏိုင္မွာျဖစ္ပါတယ္။

မွတ္ခ်က္။ အကယ္၍ သင္ဟာ WIFI network ကို အသံုးျပဳေနတယ္ဆိုရင္ေတာ့ အထက္မွာ ေဖာ္ျပထားတဲ႔ အဆင့္နဲ႔ မလံုေလာက္ပဲ ေနာက္ထပ္အဆင့္ေတြထပ္လိုအပ္အံုးမွာျဖစ္ပါတယ္။

Gmail , Yahoo Mail ထဲမွာ IP address ရွာပံုေတာ္

ရိုးရိုးရွင္းရွင္းပါပဲ ... လြယ္လည္း လြယ္ပါတယ္... ဒါ့အျပင္သိျပီးသားလည္း ျဖစ္နိုင္ပါတယ္...သိရင္ေတာ့ မဖတ္ပါနဲ႔ေတာ့ အခ်ိန္က တန္ဖိုးရွိပါတယ္... အျခား အဆင့္ျမင့္ပိုင္းေတြကို ဆက္လက္ေလ့လာ ဖို႔အၾကံျပဳပါရေစ။

IP address ရဲ႕ အေရးပါပံုကို အနည္းနဲ႔ အမ်ားေတာ့ သိေလာက္မယ္ထင္ပါတယ္...။ ဒီ post မွာေတာ့ Gmail နဲ႔ Yahoo Mail ထဲမွာ ကိုယ့္ကို Mail ပို႔လိုက္တဲ႔ သူရဲ႕ IP address ကို ရွာေဖြတဲ႔ နည္းေလးပါ။

GMail ထဲတြင္ ေပးပို႔သူရဲ႕ IP address ကိုရွာေဖြျခင္း

၁။ log in လုပ္
၂။ Mail ဖြင့္ ( ကိုယ္သိခ်င္တဲ႔ Mail ကိုေျပာတာပါ ။ )
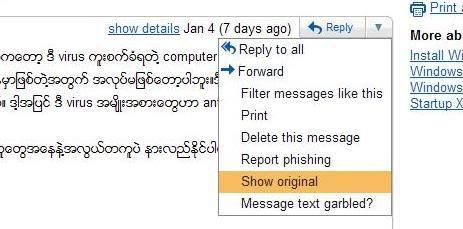
၃။ header ရဲ႕ ညာဘက္ေထာင့္ options ထဲမွာ ရွိတဲ႔ Show Original ကို click လိုက္ (ေအာက္မွာျပထားတဲ႔ ပံုထဲက အတိုင္းေပါ့ )


၄။ အဲဒါကို click ျပီးသြားရင္ new tab နဲ႔ page တစ္ခုပြင့္လာပါလိမ့္မယ္။ အဲဒီထဲမွာ hostname တခ်ိဳ႕ နဲ႔အတူ [...] ထဲက နံပါတ္ေတြကေတာ့ ဒီေမးလ္ကို ေပးပို႔လိုက္တဲ႔ သူရဲ႕ IP ျဖစ္ပါတယ္...။ ေအာက္မွာျပထားတဲ႔ ပံုစံေလးေတြအတိုင္းေတြ႔ရနိုင္ပါတယ္...။

Received: from gateway15.websitewelcome.com (gateway15.websitewelcome.com
[65.119.112.245])
client-ip=65.119.112.245;
65.119.112.245 က ေပးပို႔သူရဲ႕ IP address ျဖစ္ပါတယ္။ ပို႔လိုက္တဲ႔သူရဲ႕ IP address Track ပါ။

Yahoo Mail ထဲမွ ေပးပို႔သူရဲ႕ IP address

၁။ log in
၂။ Mial ဖြင့္လိုက္ပါ။
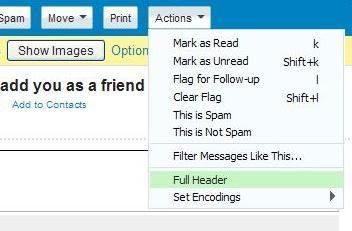
၃။ ျပီးရင္ header ညာဘက္ေထာင့္က Actions ထဲမွာ down arrow ကို click လိုက္၊ ျပီးရင္ Full Header ကို click ပါ။ (ပံုမွာၾကည့္ပါ။)


၄။ [ ] ထဲမွာ ပါတဲ႔ နံပါတ္ေတြကေတာ့ Sender ရဲ႕ IP address ျဖစ္ပါတယ္။ ေအာက္မွာျပထားတဲ႔ အတိုင္းေတြ႔ႏိုင္ပါတယ္။
X-Originating-IP: [202.65.138.109]
Received: from 127.0.0.1 (EHLO account.m.imeem.com) (202.65.138.109)
202.65.138.109 ကေတာ့ IP address ၊ Track IP address ျဖစ္ပါတယ္။

Banned Website ေတြကို ၀င္ႏိုင္တဲ႔ နည္းလမ္း (၁၀) ခု

သူငယ္ခ်င္းေတြကလည္း ေျပာၾကပါတယ္... " ban ထားတဲ႔ website ေတြကို Anonymous လုပ္ျပီး ၀င္ဖုိ႔ ဘာခက္တာမွတ္လို႔ ဒီေလာက္လြယ္ေနတာ " လို႔ေျပာပါတယ္... ဒီလို ေက်ာ္ခြျပီး၀င္တာက ျမန္မာႏိုင္ငံကလူေတြနဲ႔လည္း ယဥ္ပါးျပီးသားပါ... က်ေနာ္က အထူးအဆန္းလုပ္ျပီး တင္တာေတာ့ မဟုတ္ပါဘူး... မသိေသးသူေတြမ်ား ရွိေနမလားဆိုျပီး တင္ေပးလိုက္တာ... banned website ေတြကို access လုပ္ႏိုင္တဲ႔ နည္းလမ္းေပါင္း ေျမာက္ျမားစြာရွိပါတယ္ ... အဲဒီထဲက ထိပ္တန္းေရာက္ေနတဲ႔ (၁၀) ခုေလာက္ကို မသိေသးသူမ်ားအတြက္ ေဖာ္ျပလိုက္ပါတယ္... သိျပီးသားသူေတြကေတာ့ ဖတ္မေနပါနဲ႔ ... အခ်ိန္ကုန္ပါတယ္။

၁။ IP address ကိုအသံုးျပဳျခင္း

ဒီနည္းလမ္းကေတာ့ ၀င္ေရာက္ဖို႔ ကန္႔သတ္ထားတဲ႔ domain name ေတြကို ျဖတ္ေက်ာ္၀င္ေရာက္ဖို႔အတြက္ အရိုးရွင္းဆံုးနည္းလမ္းျဖစ္ပါတယ္။ ဥပမာ... www.webstuffscan.com ကဲ႔သို႔ေသာ domain name အစား direct IP address ကို အသံုးျပဳတာျဖစ္ပါတယ္။ IP address ကိုရွာေဖြဖို႔အတြက္ ဒီ site လိုမ်ိဳး online IP ေျပာင္းလဲေပးတဲ႔ free host တစ္ခုကို အသံုးျပဳႏိုင္ပါတယ္။


၂။ Google cache အသံုးျပဳျခင္း

အကယ္၍မ်ား site တစ္ခုခုကမ်ား banned website ကို ဖြင့္နိုင္ေလမလားဆိုျပီး စိတ္ရွည္လက္ရွည္နဲ႔ ရွာႏိုင္မယ္ဆိုရင္ေတာ့ Google cache က အေကာင္းဆံုးျဖစ္ပါတယ္။ သင္ဖြင့္ခ်င္တဲ႔ banned site ကို Google search မွာ ရုိက္ထည့္ျပီး search results ေအာက္မွာရွိတဲ႔ cached link ကို click ျပီး ၀င္ၾကည့္ဖို႔ပဲျဖစ္ပါတယ္။


၃။ Anonymizer တစ္ခုကို အသံုးျပဳျခင္း

ဒီနည္းက သံုးရတာပိုအဆင္ေျပေစပါတယ္...။ Anonymizer ဆိုတဲ႔အတိုင္းပဲ ေဖာ္ျပထားျခင္းမရွိတဲ႔ proxy တစ္ခုနဲ႔ ၀င္ေရာက္ျခင္းျဖစ္ပါတယ္။ ဒီနည္းလမ္းမွာေတာ့ သင္ဟာ third party site တစ္ခုကေန ၀င္ၾကည့္ရမွာျဖစ္ျပီး ၄င္းက သင္ ေတာင္းဆိုတဲ႔ လမ္းေၾကာင္းေပၚကို ေရာက္ေအာင္ လိုအပ္တဲ႔ server ဆီသို႔ ေျပာင္းလဲေပးပါတယ္။ အခ်ိဳ႕ serviceေတြကေတာ့ URL ကို encryption လုပ္ေပးျခင္းေတြလည္း ရွိပါတယ္။ ဒါေပမယ့္ ျပႆနာတစ္ခုရွိတာကေတာ့ အဲဒီ serverအမ်ားစုက သိပ္ၾကာၾကာ free မရတာပဲျဖစ္ပါတယ္။ ဒါေပမယ့္ ေအာက္မွာေဖာ္ျပထားတဲ႔ service ေတြကေတာ့ အလုပ္လုပ္ေနဆဲပါ (free!)။
Daily Best Links - မူလ URL ကိုေဖ်ာက္ပစ္လိုက္ျပီး အဆင္ေျပတဲ႔ လမ္းေၾကာင္းကေန ၀င္ေရာက္ႏိုင္ဖို႔ စီစဥ္ေပးပါတယ္။ အေကာင္းဆံုး free server ေတြထဲက တစ္ခုလို႔ ေျပာလို႔ရပါတယ္။
Anonymouse - ဒီဟာကလည္း သင့္ကို ေကာင္းေကာင္း အကူအညီေပးနိုင္ပါလိမ့္မယ္... ဒါေပမယ့္ URL က visible ျဖစ္ေနပါတယ္... ဒါေၾကာင့္ filtering software ေတြကေန block လုပ္ဖို႔ ျဖစ္ႏိုင္ေျခရွိေနပါတယ္။


၄။ Online Translation Tool မ်ားကို အသံုးျပဳျခင္း

ဒီနည္းလမ္းကေတာ့ က်ေနာ္တို႔ ျမန္မာဘာသာနဲ႔တင္ထားတဲ႔ site ေတြအတြက္ သိပ္မေကာင္းဘူးလို႔ ထင္တာပါပဲ။ ဒီနည္းလမ္းမွာေတာ့ translation service ေတြကို web proxy တစ္ခုကဲ႔ သို႔ အသံုးျပဳႏိုင္ပါတယ္။ ေအာက္မွာ အေကာင္းဆံုး Link ေတြကို ေဖာ္ျပေပးထားပါတယ္။
Altavista Babel fish - လြယ္ပါတယ္ Babel fish site ထဲကို သြားၾကည့္ရံုနဲ႔တင္ သိႏိုင္ပါတယ္။ သင္ လိုခ်င္တဲ႔ site ကို ထည့္လိုက္ရံုပါပဲ။
Google Translate - ဒါကလည္း Babel fish နဲ႔ အတူတူပါပဲ။


၅။ Google Mobile Search ကို အသံုးျပဳျခင္း

Google mobile search ကလည္း အလုပ္လုပ္ေပးႏိုင္ပါတယ္။ ဒါေပမယ့္ ေကာင္းေကာင္းမေဖာ္ျပေပးႏိုင္တာေတြလည္း ျဖစ္တတ္ပါတယ္။ ဒီဟာကို အသံုးျပဳရတာ Web proxy တစ္ခုကို အသံုးျပဳရတာနဲ႔ အလြန္ဆင္တူပါတယ္။


၆။ Public Proxy server တစ္ခုကို အသံုးျပဳျခင္း

အခုေဖာ္ျပထားေပးမယ့္ Website ထဲမွာ free proxy server ေတြ အမ်ားၾကီးပါ၀င္ပါတယ္။ ေတာ္ေတာ္ အားရဖို႔ေကာင္းပါတယ္။ တစ္ခုမွတ္ထားရမွာကေတာ့ ဒါေတြကို အသံုးျပဳတဲ႔အခါမွာ IE (သို႔ ) သင္ အသံုးျပဳေနတဲ႔ browser ထဲမွာရွိတဲ႔ internet connection setting ေတြကို ေျပာင္းလဲရပါတယ္။ ဒီကေနျပီး ၀င္သြားလိုက္ပါ။


၇။ Email မွတဆင့္ web pageမ်ားကို ရယူျခင္း

အကယ္၍ သင္က Web page တစ္ခုထဲကို လိုခ်င္တယ္ဆိုရင္ေတာ့ ဒီနည္းလမ္းက အသံုး၀င္ပါတယ္။ ၾကီးမားတဲ႔ file ေတြကို access လုပ္ဖို႔မျဖစ္ႏိုင္ဘူးဆိုတာေတာ့ သိၾကမွာပါ။ ေအာက္မွာ ဥပမာျပထားပါတယ္..

- message ရဲ႕ body မွာ SEND http://www.yahoo.com/ ဆိုျပီး အသံုးျပဳႏိုင္ပါတယ္။ ျပီးရင္ ၄င္းကို - agora@dna.affrc.go.jp ကို send ျပီး yahoo.com home page ကို ျပန္ရယူႏိုင္ပါတယ္။
- web2mail ဆိုတဲ႔ service မွာလည္း check out လုပ္ႏိုင္ပါတယ္။
- Expita.com မွာလည္း server ေတြအမ်ားၾကီးရွိပါတယ္။ ဒါေပမယ့္ အဲဒီစာရင္းထဲက အမ်ားစုကေတာ့ ၾကာၾကာရွည္ရွည္အလုပ္ မလုပ္ပါဘူး။

၈။ Tor Distributed Proxy ကိုအသံုးျပဳျခင္း

Tor ဆိုတာကေတာ့ anonymous server အစုအေပါင္းေတြကို အသံုးျပဳထားတဲ႔ advanced proxy server တစ္ခုျဖစ္ပါတယ္။ ဒီနည္းလမ္းမွာေတာ့ application တစ္ခုကို download ခ်ျပီး install လုပ္ထားဖို႔လိုက္ပါတယ္။


၉။ ကိုယ္ပိုင္ proxy server အသံုးျပဳျခင္း

ဒီနည္းလမ္းကေတာ့ တိုးတက္လာတဲ႔ နည္းလမ္းတစ္ခုျဖစ္ျပီး အေကာင္းဆံုးနည္းလမ္းျဖစ္ႏိုင္ပါတယ္။ သင့္ရဲ႕ အိမ္ ဒါမွမဟုတ္ hosting service provider တစ္ခုကေနျပီး သင့္ကိုယ္ပိုင္ proxy server ကို host လုပ္ေပးဖို႔လုိအပ္ပါတယ္။ ဒီနည္းလမ္းမွာ သင္ဟာ SSL (Secure Socket Layer) ကို enable လုပ္ထားရမွာျပီး ပါ၀င္လာတဲ႔ အေႏွာင့္အယွက္မွန္သမွ်ကို တားဆီးႏိုင္ပါမယ္။ ဒါ့အျပင္ access control လည္း ထည့္ထားရမွာျဖစ္ပါတယ္... အဲလိုမွမဟုတ္ဘူးဆိုရင္ေတာ့ တျခားတစ္ေယာက္က service ကိုေတြ႔ရွိသြားႏိုင္ျပီး အလြဲသံုးစား လုပ္ႏိုင္ပါတယ္။ ( ဒီလိုအလြဲသံုးစား လုပ္ႏိုင္ဖို႔ ရွာေဖြေနတဲ႔ သူေတြမ်ားၾကီး ရွိပါတယ္။) [ proxy server ျပဳလုပ္ျခင္း အဆင့္ဆင့္ကို ကိုယ္ပိုင္ proxy server ျပဳလုပ္ျခင္း တြင္ၾကည့္ပါ။ ]
Apache Web server ကို proxy server ကဲ႔သို႔အသံုးျပဳျခင္း - setup လုပ္ဖို႔အတြက္ အနည္းငယ္ရႈပ္ေထြးပါတယ္။
Privoxy အသံုးျပဳျခင္း - ဒါကေတာ့ recommended approach ပါ။ အေသးစိတ္အခ်က္အလက္မ်ားကို သိႏိုင္ဖို႔အတြက္ ဒီ page မွာ သြားၾကည့္ႏိုင္ပါတယ္။


၁၀။ Alternate content providerမ်ားကို အသံုးျပဳျခင္း

တစ္ခုနဲ႔မွာ အဆင္မေျပဘူးဆိုရင္ေတာ့ သင္ဟာ Alternate service provider ေတြကို အသံုးျပဳႏိုင္ပါတယ္။ ဥပမာ သင္ရဲ႕ ေနရာမွာ Gmail ကို banned ထားတယ္ဆိုရင္ သင္ဟာအျခား မထင္ရွားတဲ႔ mail address ေတြကို ရယူအသံုးျပဳႏိုင္ျပီး Gmail မွ email forward ကို enable လုပ္ႏိုင္ပါတယ္။

[ web proxy ( ၃၀၀ ) ေက်ာ္ကို ဒီ blogမွာ သြားျပီး ယူသံုးႏိုင္ပါတယ္...။]


(မွတ္ခ်က္ - public proxy server ေတြကို အသံုးျပဳတဲ႔ အခါမွာ သတိထားဖို႔လိုပါတယ္။ ျဖတ္သန္းလာတဲ႔ data ေတြကို အေႏွာင့္အယွက္ေပးဖို႔အတြက္ hosting service ျပဳလုပ္ထားတဲ႔ သူေတြလည္း ျဖစ္ေနႏိုင္ပါတယ္။ ဒါေၾကာင့္ public proxy server ေတြကို အသံုးျပဳတဲ႔ အခါ အေရးၾကီးတဲ႔ ဘယ္ information မဆို (ဥပမာ - credit card နဲ႔ဆိုင္တဲ႔ အေသးစိတ္အခ်က္အလက္ေတြ ) ကို မထည့္မိဖို႔ အထူးသတိျပဳပါ။)

Friday, February 11, 2011

Repairing Memory Stick

Memory Stick ေတြ လူသုံးမ်ားသလိုပဲ အပ်က္လည္း မ်ားလွပါတယ္။ ကြန္ပ်ဴတာက မသိေတာ့တာ၊ Format ခ်ခိုင္းတာ၊ ဖိုင္ေတြ ထပ္ထည့္လို့မရေတာ့တာ၊ Capacity အၿပည့္မရေတာ့တာ စသည္ၿဖင့္ ၿပဿနာေတြက စုံလွပါတယ္။ အခုေတာ့ Format ခ်ခိုင္းတယ္၊ ဒါေပမဲ့ Format ခ်မရတဲ့ Memory Stick တစ္ေခ်ာင္းကို ၿပဳၿပင္နည္းေလးကို ေရးသားေပးလိုက္ပါတယ္။

သေဘာတရားကတာ့ Format ခ်ခိုင္းတယ္ဆိုတာက တနည္းအားၿဖင့္ File System မရိွလို့ပါပဲ။ Format ခ်လည္း မရတာကေတာ့ Partition Table က Corrupt ၿဖစ္လို့ပါ။ အဲဒါေၾကာင့္Partition Table ဖ်က္ၿပီးအသစ္ၿပန္ေဆာက္၊ ၿပီးေတာ့ File System ၿပန္သတ္မွတ္လိုက္ရင္ ၿပန္ေကာင္းသြား
ပါလိမ့္မယ္။ လိုအပ္တဲ့ Software ကေတာ့ ႏွစ္ခုတည္းပါ။Test Disk ရယ္ Bootice ရယ္ပါ။
ပထမဆုံး Test Disk ကို Run ပါ။ ေအာက္မွာၿပထားသလို ေပၚလာပါလိမ့္မယ္။
No Log ကို Keyboard က Arrow Key နဲ့ ေရြးေၿပီး Enter ေခါက္ပါ။ အဲဒီအခါမွာ Hard Disk နဲ့ Memory Stick ရယ္ ေပၚလာပါလိမ့့္မယ္။ Memory Stick ကို ေရြးပါ။ Enter ေခါက္ပါ။ ေနာက္ထပ္ သူက Partition Table type ကို ေရြးခိုင္းပါလိမ့္မယ္။ Intel ကို ေရြေးၿပီး Enter ေခါက္ပါ။ အဲဒီအခါမွာ [Analyse] [Advanced] [Geometry] စသည္ၿဖင့္ေရြးခ်ယ္စရာေတြေပါလာပါလိမ့္မယ္။ အဲဒီထဲက [Delete] ကို ေရြးၿပီး Enter ေခါက္ပါ။ Yes/No ေမးရင္ Y ကို ႏိွပ္ၿပီး Enter ေခါက္ပါ။ ဒါဆိုရင္ Memory Stick ရဲ့ Partition Table ကို ဖ်က္ၿ္ပီး သြားပါၿပီီ။

ဒီထိဆိုရင္ TestDisk ရဲ့အပိုင္း ၿပီးသြားပါၿပီ။ ေနာက္ထပ္ Bootice ကို Run ပါ။ ေအာက္မွာ ၿပထားသလို ေပါလာပါလိမ့္မယ္။
Perform Format ကို ႏွိပ္ပါ။ ေနာက္တစ္ဆင့္ ေပၚလာရင္ USB-HDD mode (Single Partition) ကို ေရြေပးပါ။ Next ကို ႏိွပ္ေပးပါ။ Dialog box ေပၚလာရင္ OK ႏွပ္ပါ။ ဒါဆိုရင္ Format စရိုက္ပါလိမ့္မယ္။ ရပါၿပီ။ စာဖတ္သူရဲ့ Stick အပ်က္ကေလး ၿပန္ေကာင္းသြားပါလိမ့္မယ္။

Download Bootice (100KB)
http://db.tt/5h9XrtN
Download TestDisk (1.44MB)
http://db.tt/Nwmbws6

ကိုယ့္ရဲ႕ Wifi မ်ား ယူသံုးေန ႀကသလား?


အခုက ေတာ့ အားလံုး နီးပါး wireless ေခတ္ပါ။ ရံုးေတြ သာမက၊ အိမ္ေတြ မွာပါ wireless ကို လြယ္လြယ္ ကူကူ သံုးလာ ႀကသလို၊ ေတာ္ေတာ္ မ်ားမ်ားကလည္း wireless network အတြက္ လံုျခံဳေရးကို ေပါ့ေပါ့ တန္တန္ သေဘာ ထား လာႀကပါတယ္။


တကယ့္လို႕ ကိုယ္က ျမန္ႏႈန္းျမင့့္ အင္တာနက္ ကိုတပ္ထားတယ္။ ေဘး ပတ္ဝန္းက်င္ကသာ ကုိယ့္ရဲ႕ wireless network ကို ယူသံုးျပီး အဲဒီ ျမန္ႏႈန္းျမင့္ လိုင္းကို ပါ သံုးေန ရင္ ကိုယ့္အတြက္ နစ္နာမႈ ေတြ ရွိသလို ကိုယ့္ ကြန္ယက္ အတြက္ပဲ share လုပ္ထားတဲ့ အေရးႀကီး data ေတြပါ သူတို႕ ယူႀကည့္လို႕ ရ လို႕ကေတာ့ ျပသနာ ရွိတဲ့ အျပင္ မေတာ္လို႕ သူတို႕က တရားမဝင္ အလုပ္ ေတြကို ကိုယ့္ရဲ႕ ကြန္ယက္ကို အသံုးျပဳျပီး လုပ္တယ္ ဆိုရင္ အႀကီး အက်ယ္ ျပသနာ တက္မဲ့ ကိစၥ ပါ။ ဒါေႀကာင့္အခု ကိုယ့္ရဲ႕ wireless network ကို ယူသံုး ေနတာ ရွိမရွိ ဆိုတာ သိႏိုင္ဖို႕ စစ္ေဆးႏိုင္တဲ့ အခ်က္ အလက္ ေတြကို သိသေလာက္ ေဖာ္ျပေပးလိုက္ပါတယ္။

အလြယ္ဆံုးက မီးစစ္ဖို႕

Wireless router မွာ မီးေတြ ပါပါတယ္။ အဲဒီမီးေတြ ထဲက အင္တာနက္ မီး က network ထဲက စက္တစ္ လံုးလံုးက internet ကို သံုးေနရင္ မွိတ္တုတ္မွိတ္တုတ္နဲ႕ ျပေနပါတယ္။ ဒါေႀကာင့္ အလြယ္ဆံုး စစ္ေဆး ခ်င္ရင္ ကိုယ့္ network ထဲမွာ ရွိတဲ့ အင္တာနက္သံုး ႏိုင္တဲ့ ပစၥည္းေတြ အားလံုးကို ပိတ္၊ မပိတ္ ခ်င္ရင္ လည္း အင္တာနက္မသံုး ႏိုင္ေအာင္ setting ထဲမွာေျပာင္းျပီး အဲဒီ မီးကို ႀကည့္ဖို႕ပါ။ ပစၥည္းေတြကို ပိတ္ဆို႔ တဲ့ ေနရာမွာ အင္တာနက္ ကို သံုး ႏိုင္တဲ့ iPod, music player, game console, TV စသျဖင့္ အင္တာနက္ ခ်ိတ္ဆက္တဲ့ function ပါတဲ့ ပစၥည္း အားလံုး အားလံုးကို ပိတ္ရမွာ ျဖစ္ပါတယ္။ အားလံုးပိတ္ျပီး လို႕မွ ကိုယ့္ရဲ႕ wireless router က မီးက မျငိမ္ပဲ မွိတ္တုတ္ပဲ ျပေန ေသးတယ္ ဆိုရင္ေတာ့ ေသခ်ာ သေလာက္ရွိပါျပီ – အနီးအနားက တစ္ေယာက္ေယာက္က ယူသံုးေနျပီ ဆိုတာ။

MAC address ကို စစ္ဖို႕

ေနာက္ ပိုေသခ်ာတဲ့ နည္းကေတာ့ router ရဲ႕ setup ကေန ဝင္စစ္ဖို႕ ပါ။ အဲလို စစ္ဖို႕အတြက္ ပထမဆံုး router ရဲ႕ IP address ကို သြားရပါမယ္။ router ရဲ႕ IP address ကို မသိရင္ ကြန္ပ်ဴတာ ရဲ႕ run မွာ cmd လို႕ ရိုက္ထည့္၊ ေပၚလာတဲ့ screen အမဲ နဲ႕ command prompt မွာ ipconfig လို႕ ရိုက္ထည့္ျပီး က်လာတဲ့ list ထဲက default gateway ဆိုတာ router ရဲ႕ IP address ပါ။

ဒါဆိုရင္ အဲဒီ IP ကို browser မွာ ရိုက္ထည့္ရင္ username နဲ႕ password ေတာင္းပါလိမ့္မယ္။ အဲဒိီမွာ ကိုယ္ထည့္ ထားတဲ့့ password ကို ထည့္ျပီး setup ထဲကို ဝင္ႏိုင္ပါတယ္။ တကယ္လို႕ password မေျပာင္းထား ရင္ router ရဲ႕ manual ထဲမွာ သူ႕ရဲ႕ default password ကို ရွာဖတ္ လို႕ရျပီး ေကာင္းတာကေတာ့ router ရဲ႕ default password ကိုလည္း ေျပာင္းလဲ ထားဖို႕ပါ။

Setup ထဲ ေရာက္ျပီ ဆိုရင္ေတာ့ အဲဒီမွာ သံုးတဲ့ router ေပၚမူတည္ျပီး connected devices, attached devices, device list စသျဖင့္ ေရးထားတဲ့ ေနရာ ရွိပါတယ္။ အဲဒီမွာ လက္ရွိ ကိုယ့္ရဲ႕ network ကိုသံုးေနတဲ့ လက္ရွိ MAC address ေတြ ကို ျပသ ေပးပါတယ္။ ကၽြန္ေတာ္ က ေတာ့ linksys router ကို သံုးတာေႀကာင့္ အဲဒါကို status ေအာက္က local network ေအာက္က DHCP list ေအာက္မွာ ႀကည့္ရင္ MAC address ေတြ အျပင္ device name ေတြ ပါ ျပေပးတာ ေတြ႕ရပါတယ္။


အဲဒီမွာ MAC address ဆိုျပီး အခု တေလာ ဂ်ာနယ္ ေတြရဲ႕ wireless router ေႀကာ္ျငာ ေတြမွာ မႀကာခဏ ေတြ႕ေန ရပါတယ္။ MAC address နဲ႕ စစ္ႏိုင္တယ္ စသျဖင့္ ပါတတ္ပါတယ္။ အထူး သျဖင့္ outdoor wireless router ေႀကာ္ျငာ ေတြမွာပါ။

အဲဒီ MAC address ဆိုတာ – Media Access Control address ျဖစ္ျပီး network ကတ္ တိုင္းမွာ ထည့္သြင္းထားတဲ့ မတူညီတဲ့ နံပါတ္ တစ္ခုဆီ ကို ဆိုလို တာပါ။ ဒါေႀကာင့္ router ထဲမွာ ကိုယ္မသိတဲ့ MAC ေတြ ရွိမရွိ စစ္ႀကည့္ျပီးေတာ့လည္း wifi ကို ယူသံုးေန မသံုးေန၊ ပြားသံုးေန မသံုးေန ဆိုတာ ကို သိႏိုင္ပါတယ္။

MAC ကို ဘယ္လို ရွာမလဲ

ကိုယ္ခြင့္ျပဳထားတဲ့ ကြန္ပ်ဴတာ ေတြမွာ တပ္ထားတဲ့ network card ေတြရဲ႕ MAC ကို သိဖို႕က ေတာ့ပထမဆံုး start ထဲက run မွာ cmd လို႕ ရိုက္ထည့္ျပီး ေပၚလာတဲ့ command prompt – screen အမဲ ထဲမွာ ipconfig /all ဆုိျပီး ရိုက္ထည့္ ရပါမယ္။ ipconfig ရဲ႕ ေနာက္မွာ space တစ္ခု ခ်န္ျပီးမွာ /all ကို ရိုက္ရမွာပါ။ က်လာတဲ့ list ထဲမွာ ကိုယ္သံုးထားတဲ့ network card ရဲ႕ ေအာက္ဖက္မွာ ပံုမွာ ျပထားတဲ့ အတိုင္း MAC address ရွိပါတယ္။


အဲဒါေတြကို မွတ္ထားျပီး ကိုယ့္ router ရဲ႕ list ထဲက MAC နဲ႕ တိုက္စစ္လို႕ ရသလို၊ တခ်ိဳ႕ Router ေတြမွာ Wireless ကို သတ္မွတ္ထားတဲ့ MAC ေတြပဲ သံုးလို႕ ရေအာင္ filter လုပ္လို႕ ရပါတယ္။ Linksys ရဲ႕ router မွာေတာ့ ဒီလို ျပထားတာ ေတြ႕ရပါတယ္။

မိုဘိုင္းဖုန္းေတြမွာလည္း Wifi သံုးလို႕ရတဲ့ ဖုန္း ျဖစ္ရင္ MAC ကို setting တစ္ေနရာရာ မွာ ရွာလို႕ရပါတယ္။ ဖုန္း အမ်ိဳးအစားေပၚ မူတည္ ျပီး website ေတြမွာ ရွာႀကည့္လို႕ ရႏိုင္ပါတယ္။

Thursday, February 10, 2011

Free Image Hosting Sites


If you are one of those looking for free image hosting, the following sites are a great place to begin with. They are absolutely Free. However, you need to remember that the Best Things are not always Free, so you may have to upgade to get the best from these sites. As a beginner, the Free service they shell out will be sufficient.
Here is the list:
  1. Flickr – 20 MB monthly upload limit / unlimited bandwidth
  2. Zooomr – 100 MB monthly upload limit / unlimited bandwidth
  3. Visadig – Max file size 1.6MB / unlimited bandwidth
  4. Photobucket – 1 GB disk space / 25 GB monthly bandwidth
  5. TinyPic – Unlimited photo hosting and bandwidth
  6. PutPix – 2 GB of space / 10 GB bandwidth / 2 MB file size limits
  7. ImageShock.eu – no limits mentioned / cool bonus tools included
  8. ImageShack – max file size of 1.5 MB / unlimited bandwidth
  9. Supload – unlimited disk space and bandwidth
  10. ImageVenue – max file size of 3 MB / unlimited bandwidth
  11. ImageTitan – max file size 1536 KB / unlimited bandwidth
  12. PixHosting.info – max file size 10 MB / unlimited bandwidth
  13. ImagesFly.com – max file size 5 MB / unlimited bandwidth
  14. PostImage – max file size 4 Mb / unlimited bandwidth
  15. FreeImageHost -max file size 3 MB / unlimited bandwidth
  16. ImageBam – max file size 3 MB / unlimited bandwidth
  17. ImageCabin -max file size 25 MB / unlimited bandwidth
  18. WeImage – max file sie 2 MB / unlimited bandwidth
Src: Mizoram Express

Tuesday, February 8, 2011

လက္ေတာ့ပ္ႏွင့္နူုတ္ဘုတ္အားနည္းအားသာႏိူင္းယွဥ္ခ်က္

What's The Difference Between Laptop and Notebook Computers?....


Most people use the terms notebook and laptop computer interchangably. Once it's not sitting on top of your desk every portable computer instantly becomes a notebook or laptop regardless of its configuration or individual specification. There are, however, some very big differences between notebook and laptop computers and it's important that you're aware of these differences during the buying process.
This article is being written on a laptop computer as a matter of coincidence but let's get to the meat of the article and explain the basic differences that you need to be aware of.
Let's look at the notebook computer first.

The Notebook Computer

A standard notebook has the following features:
1. Ultralight. Less weight is better.
2. 4 - 5 hour battery life.
3. No internal floppy drive.
4. Minimal graphics subsystem.
5. No internal DVD or CD system.
6. 12" - 14" TFT screen.
7. Low profile (thin).
8. Integrated modem and network connection.
9. Smallest possible keyboard that retains functionality.
10. Low power consumption Celeron/Centrino or Sempron style processor.
DILKIBAAT
In essence a notebook computer is designed to provide mobile computing that won't break your back yet still offer all the power the mobile users requires for work and some leisure pursuits. This portability normally comes at a price. The level of minituarization involved comes at a cost and high end notebooks can prove to be quite expensive.

The Laptop Computer

Now for the laptop computer. Again look at the name. A laptop is designed to sit on your lap and you can therefore expect it to be quite large and loaded down with features and power. The
The standard laptop computer would have some ,if not all, of the following features:

1. 14" - 17" (widescreen) TFT screen.
2. Nvidia GeForce or ATI Radeon graphics subsystem.
3. Internal DVD-ROM or DVD-RW drive
4. Large full featured keyboard.
5. 3 hour+ battery life.
6. Upgradeable.
7. Integrated modem, network, Bluetooth and Wi-Fi capabilities.
8. High quality integrate audio and speaker system.
9. Low power consumption, high performance Intel Centrino style processor.


From reading the above information you'll see that the notebook is the exact opposite of the laptop. Notebooks offer reasonable power and extreme portability. Laptops are designed to be capable of replacing an entire desktop PC if necessary whilst still offering desktop performance in a mobile platform. Hopefully this article has helped clear up the differences between both classes of portable computers. As time and technology moves on the line between laptop and notebook will continue to blur but for right now it's still clearly defined and driven by the demands of the portable computer market.

Window 7 ကို Software မသုံးပဲ Partition ပိုင္းၾကည့္ရေအာင္ေနာ္

သိၿပီးသားဆရာမ်ားအတြက္ေတာ့္ sorry ပါေနာ္
1. Desktop က My Computer >> right click ႏွိပ္ၿပီး Manage ကိုေ႐ြးေပးလိုက္ပါ။

2. Computer Management box ေပၚလာပါမယ္။

3. Storage >> Disk Management ကို ေ႐ြးေပးလိုက္ပါ။

4. မိမိပြားယူမယ့္အပိုင္းကိုခြဲဖို႔ မူလရွိသည့္ HDD ကိုေ႐ြးေပးပါ။ (တစ္ပိုင္းတည္းဆို C:/ ကိုေ႐ြးေပးပါ) တစ္ပိုင္းတည္းကို ျပန္ခြဲတာပဲေျပာျပပါ့မယ္ . အတူတူပါပဲ ကၽြန္ေတာ္က C:/ တစ္ပိုင္းတည္းကို ႏွစ္ပိုင္းျပန္ခြဲျပမွာပါ

5. C:/ >> right click ႏွိပ္ၿပီး shrink volume ကိုေ႐ြးေပးလိုက္ပါ

6. Enter the amount of space to shrink in MB မွာ မိမိ ပိုင္းခ်င္တဲ့ပမာဏကို ထည့္ေပးရမွာပါ . (1024 MB = 1 GB)

7. ၿပီးတာနဲ႔ Shrink ကိုႏွိပ္ေပးလိုက္ပါ

8. Partition အသစ္တစ္ခု တိုးလာတာကိုေတြ႕ရမွာပါ ေတြ႕တဲ့ partition အသစ္ကို right click ေထာက္ၿပီး New Simple Volume ကိုေ႐ြးေပးၿပီး Next .... Next ဆိုၿပီးေတာ့ ဆက္ႏွိပ္သြားလိုက္ၿပီးတာနဲ႔ ေနာက္ဆုံးမွာ Partition အသစ္တစ္ခု ထပ္တိုးလာတာကိုေတြ႕ရမွာပါ။

အားလုံးအဆင္ေျပပါေစဗ်ာ ..

lollyport The Complete Windows 7 Shortcuts eBook Released

We are pleased to release The Complete Windows 7 Shortcuts eBook. Windows 7 includes a lot of new keyboard shortcuts that are unknown to a new user. This eBook comprises of more than 200 keyboard shortcuts containing almost all the keyboard shortcuts that are available in Windows 7 and its default programs like Paint, WordPad, MS Office, Calculator, Help, Media Player, Media Center, Windows Journal, Internet Explorer, etc.

win7 shortcuts ebook The Complete Windows 7 Shortcuts eBook Released

The eBook is pretty exhaustive and the topics covered include:

- What is Keyboard & how to use it?
- How keys are organized on a standard Keyboard
- Typing & editing the text using Keyboard
- Using Keyboard Shortcuts
- Find program shortcuts
- Choose menus, commands, and options
- Some useful shortcuts
- Using the keyboard extras
- Using navigation keys
- Using the numeric keypad
- Three odd keys
- Use your keyboard safely
- Create keyboard shortcuts to open programs
- Make the keyboard easier to use
- Type without using the keyboard (On-Screen Keyboard)
- Set On-Screen Keyboard to use for various handy tasks

- The Shortcuts Collection
- General Windows functions keyboard shortcuts
- Dialog box keyboard shortcuts
- Windows logo key keyboard shortcuts
- Windows Explorer keyboard shortcuts
- Ease of Access keyboard shortcuts
- Magnifier keyboard shortcuts
- Remote Desktop Connection keyboard shortcuts
- Keyboard shortcuts for MS Paint
- Keyboard shortcuts for WordPad
- Keyboard shortcuts for Calculator
- Windows Journal keyboard shortcuts
- Windows Help viewer keyboard shortcuts
- Windows Media Player keyboard shortcuts
- Internet Explorer keyboard shortcuts
- Windows Media Center keyboard shortcuts.

http://www.ziddu.com/download/13710682/Windows7ShortcutseBook.zip.html

Monday, February 7, 2011

ဖုန္းသတင္း အြန္လိုင္း တင္ေနၿပီ။

ဖုန္းႏွင့္ပတ္သက္ေသာ သတင္းမ်ားအား အြန္လိုင္းေပၚတြင္ အခမဲ့ ၾကည့္႐ႈႏိုင္မည့္ အစီအစဥ္ တစ္ရပ္ကို ေဆာင္ရြက္မည္ျဖစ္ေၾကာင္း လူႀကီးမင္း ဖုန္းဆိုင္မွ အေထြေထြမန္ေနဂ်ာ ဦးကိုကိုေအာင္က ေျပာသည္။အဆိုပါ အစီအစဥ္အား ေဖေဖာ္၀ါရီလ အတြင္း ေဆာင္ရြက္မည္ ျဖစ္ၿပီး ယခင္လႊင့္တင္ထားေသာ လူႀကီးမင္း၀က္ဘ္ဆိုက္ (www.Lugyimin.com) မွတစ္ဆင့္ ေဆာင္ရြက္သြားမည္ ျဖစ္ေၾကာင္း သိရသည္။ “အခ်ိန္ႏွင့္တစ္ေျပးညီ ျဖစ္ေနတဲ့ ဖုန္းသတင္းေတြ၊ မိုဘိုင္းဖုန္း အသံုးျပဳရာမွာ ျဖစ္ေပၚတတ္တဲ့ ျပႆနာေတြ၊ ဥပမာအားျဖင့္ ဖုန္းထဲမွာ အင္တာနက္သံုးလို႔ မရရင္ ဘယ္လိုလုပ္သင့္တယ္ဆိုတဲ့ လမ္းညႊန္ခ်က္ေတြ ပါ၀င္မွာပါ။

မိုဘိုင္းဖုန္း အသံုးျပဳသူေတြ အေနနဲ႔ ဆိုင္ေတြကို သြားေရာက္စရာ မလိုဘဲ မိမိ မိုဘိုင္းဖုန္းကို မိမိဘာသာ ျပဳျပင္ထိန္းသိမ္းႏိုင္ဖို႔ အတြက္ ရည္ရြယ္ၿပီး လႊင့္တင္ထားျခင္း ျဖစ္ပါတယ္”ဟု ၎က ေျပာသည္။ ၎၀က္ဘ္ဆိုက္တြင္ မိုဘိုင္းဖုန္း သတင္းမ်ား၊ မိုဘိုင္းဖုန္း ျပႆနာမ်ား အျပင္ ေစ်းကြက္အတြင္း ေပၚျပဴလာျဖစ္ေနေသာ ဟန္းဆက္မ်ား အေၾကာင္း၊ ၎ဟန္းဆက္မ်ား၏ အားနည္းခ်က္၊ အားသာခ်က္မ်ား အျပင္ ေနာက္ဆံုး၀င္ေရာက္လာေသာ ဟန္းဆက္မ်ားကိုလည္း အခ်ိန္ႏွင့္ တစ္ေျပးညီ အခမဲ့ ေဖာ္ျပသြားမည္ ျဖစ္ေၾကာင္း သိရသည္။ ၎အျပင္ မိုဘိုင္းဖုန္းႏွင့္ ပတ္သက္သည့္ ေဆာ့ဖ္၀ဲမ်ား၊ ဂိမ္း၊ Ring Tone,Themes, Wall paper ႏွင့္ Screen Saver မ်ားကိုလည္း အခမဲ့ Download ျပဳလုပ္ႏိုင္မည္ ျဖစ္ေၾကာင္း၊ ၎၀က္ဘ္ဆိုက္အား ၂၀၁၀ ခုႏွစ္တြင္ စတင္ လႊင့္တင္ခဲ့ၿပီး အခမဲ့ႏွင့္ အခေပး ၀န္ေဆာင္မႈမ်ား ပါ၀င္ခဲ့ေၾကာင္း သိရသည္။

Thursday, February 3, 2011

Art Project, Powered by Google


ဒီေန႕google ကိုဖြင့္ရင္း ခုပံုထဲမွာ ျပထားတာေလးကိုေတြ႕လို႕ လိုက္ဝင္ၾကည့္တာ google က      အသစ္လုပ္ေပးလိုက္တဲ့
Art project ေလးကို ေတြ႕တာပဲ.သူက ဘာတြက္လဲ ဆိုေတာ့ ကမၻာေပၚက ထင္ရွားတဲ့ အနုပညာ     ျပတိုက္ေတြ ျပခန္းေတြ
ကို တေနရာထဲကေန ၾကည့္လို႕ရေအာင္ စီစဥ္ေပးလိုက္တာပဲ.ဘယ္နိုင္ငံက musen ကိုၾကည့္ ခ်င္တယ္ ဆိုရင္ ေရြးျပီးေတာ့
သြားၾကည့္လို႕ရတယ္ေလ.က်ေနာ္တို႕အရင္က google map ေလး သံုးေနသလိုပဲ ျပတိုက္ ခန္းမ တခုလံုးကိုလွည့္ပတ္ၾကည့္
ရွု႕နိုင္ျပီးေတာ့ ကိုၾကည့္ခ်င္တဲ့ေနရာကို အေသးစိတ္ၾကည့္နိုင္ပါေသးတယ္.က်ေနာ္ေအာက္မွာ အစမ္းအေနနဲ႕ ပန္းခ်ီဆရာၾကီး
van gogh ရဲ႕ ပန္းခ်ီကားေလးကိုၾကည့္တာျပထားပါတယ္.သူျပထားတဲ့ ပန္းခ်ီကား ဘယ္ေန႕မွ စဆြဲတယ္ ဘယ္ေနရာမွာတည္
ရွိလဲ ဆိုတာက အစ အေသးစိတ္ၾကည့္နိုင္ပါတယ္.ေနာက္တခုက ကိုၾကည့္တဲ့ ဟာေလးကို သေဘာက်တယ္ဆိုရင္လဲ ကိုသံုးေန
တဲ့ FACEBOOK ,TWITTER လို ဆိုဒ္ေတြမွာ ျပန္ရွယ္ခြင့္ေပးထားပါတယ္.ဒီေလာက္ဆိုနားလည္က်ပါေလ့မယ္ ေအာက္ကပံု
ေလးေတြကိုၾကည့္လိုက္ရင္ ပိုျပည့္စံုပါေလ့မယ္..


ပံုေတြကို တမင္ အၾကီးနဲ႕ ထည့္ေပးထားတာပါ ၾကည့္ရတာ အဆင္ေျပေအာင္လို႕ပါ.လံုးဝၾကည့္ရတာအဆင္မေျပရင္ေတာ့ တခုခုကေန ပံုေတြကိုတင္ေပးပါမယ္
ခုေအာက္မွာ youtube က အဆင္မေျပတဲ့ သူေတြတြက္guide ေလးကိုသီးသန္႕ တင္ေပးလိုက္ပါတယ္.
http://vimeo.com/19480800
သူတို႕ဘယ္သူ ဒါေလးကိုလုပ္ခဲ့လဲဆိုတာကို ျပန္ျပထားတာပါ
http://vimeo.com/19480847

အဆင္ေၿပ ပါ ေစ။ ။ ။

Tuesday, February 1, 2011

59 Best Web Design of Year 2010

Now a days, Lots of design techniques are popular in the web design market such as HTML5, Ajax, JavaScript, jQuery, CSS 3 and many more.  CSS 3 is the modern and web standard techniques with its latest element and functionality. CSS 3 is the latest version of CSS(Cascading Style Sheet). Web design in not a easy task, so today we are going to share some attractive and inspirational web designs for designers, i hope you can get some new and fresh web design idea from this best list. With the help of these CSS and CSS 3 features, we can make our websites more attractive and alive.
So Today we are Providing best list of web designs of Year 2010. I hope you will like this collection and fresh CSS web designs listed below.

Web Design – 1) Mix and Mash


Web Design – 2) Rudalov


Web Design – 3) Wawa coffee topia


Web Design – 4) Leslee mitchell


Web Design – 5) Shelfluv


Web Design – 6) Ericsteuten


Web Design – 7) Duchy of cornwall nursery


Web Design – 8 ) Market harding


Web Design – 9) Wows


Web Design – 10) Need Style


Web Design – 11) Dab Project


Web Design – 12) Ian Mintz


Web Design – 13) Alexandrapalace


Web Design – 14) Webdesignbe


Web Design – 15) Ideiascompernas


Web Design – 16) Icon Moon


Web Design – 17) Heathwaller


Web Design – 18) Aw Digital


Web Design – 19) Annaneale


Web Design – 20) Alinga


Web Design – 21) Damngood


Web Design – 22) Inserviowebsolutions


Web Design – 23) Design Zoom


Web Design – 24) Dropr


Web Design – 25) Karijobe


Web Design – 26) V Replay


Web Design – 27) Uberflock


Web Design – 28) Alessandrogiammaria


Web Design – 29) Ronewmedia


Web Design – 30) Sproutfund


Web Design – 31) Phobiahz


Web Design – 32) Amazeelabs


Web Design – 33) Vreplay


Web Design – 34) The wisdom of bees


Web Design – 35) Awesomejs


Web Design – 36) Fluxar


Web Design – 37) Acmecreative


Web Design – 38) Webstationinc


Web Design – 39) Brain Brain


Web Design – 40) Phobiahz


Web Design – 45) Brand Design


Web Design – 46) Pebbledesign


Web Design – 47) Dawghousedesignstudio


Web Design – 48) Aidanhornsby


Web Design – 49) Simonfosterdesign


Web Design – 50) Favela


Web Design – 51) Commotion


Web Design – 52) Design Snips


Web Design – 53) Aka Acid


Web Design – 54) Inglorie


Web Design – 55) We are Hunted


Web Design – 56) Square Four


Web Design – 57) Small White Bear


Web Design – 58) Planmysite


Web Design – 59) Green Onion